Enabling Code Coverage for Sitecore with Coverlet & Github Actions

Last week I was tasked with enabling Code Coverage in our Sitecore Visual Studio solution and getting it into CodeCov (via our build pipeline). I ended up going down quite the Rabbit hole of different options and hitting a lot of brick walls along the way.

I finally figured it out and got it working though so thought I’d share my findings and what I did in the end to get this working.

TLDR - add this to your CI workflow in Github actions and adjust the settings as required.

What is Code Coverage?

In simple terms it gives you an idea of how many of your lines of code are covered by tests and therefore how confident you can be in making changes and releasing without breaking things. I’m not going to get into if this is a good idea, how accurate it is as a indication of the quality of your tests or if it’s a waste of time here – as I was just asked to get it setup and working. I don’t think were aiming for 100% code-coverage but we want to know the level of coverage we have and where we need to improve it. By the way the header image above is a lie (I hacked it together) – 100% sure looks nice though :-).

What Code Coverage options are there?

There are quite a few, but some of them are paid for. Given the cost cutting across the board at the moment I felt free ones were best to investigate first. The ones I looked at were as follows:

Selected Tools

Read more below on reasoning but in the end I went with the following:

After trying AltCover for a while and struggling to get the filtering working on various dlls I decided to try Coverlet. Coverlet seems to be the defecto standard and is included by default in ASP.NET 6.0+ projects and .NET Core projects in Visual Studio now.

As our Sitecore 10.3 project is traditional MVC, we are tied to .NET 4.8 framework. Also our projects are fairly legacy and have been upgraded a few times. Therefore it’s not possible to install Coverlet as an NuGet package within the test projects and use MSBuild as Id like to have. It seems this is only possible for newer SDK style projects or .NET core ones and not .NET Framework classic projects. So I had to instead go for using the Coverlet console – which in the end worked pretty well.

How do I use it?

So first you need to install it the coverlet console globally like so:

dotnet tool install --global coverlet.console

Then for each of your test projects you need to execute a command like so:

coverlet "C:\Projects\sc103-flux\src\Foundation\Accounts\Tests\bin\FluxDigital.Foundation.Accounts.Tests.dll" --target "C:\Program Files (x86)\Microsoft Visual Studio\2019\Community\Common7\IDE\Extensions\TestPlatform\vstest.console" --targetargs "C:\Projects\sc103-flux\src\Foundation\Accounts\Tests\bin\FluxDigital.Foundation.Accounts.Tests.dll /Parallel /Logger:TRX" --output "C:\Projects\sc103-flux\coverlet\coverlet-report1.cobertura" --format cobertura --include "[FluxDigital.*]*" --verbosity detailed

What this does is pass your test project dll to Coverlet and tell it to run Xunit to execute the tests. We also send some Params to XUnit to ensure it runs the the tests in parallel and logs out to the console. Lastly we pass some Params to the coverlet to tell it to filter on certain dlls as – otherwise it seems to try and monitor/test 3rd party dlls as well as our code. If you get any errrors in the console it might be because you are not filtering everything out you need to.

So to break it down in more detail:

  • coverlet – runs the coverlet console
  • “..\FluxDigital.Foundation.Accounts.Tests.dll” – this is the test project dll to run codecoverage on
  • –target  ..\vstest.console” – the path to the VSTest console, ensure this path is correct for your version of Visual Studio
  • /Parallel – runs the tests in VSTest in Parallel
  • /Logger:TRX – log out details to the console from VSTest
  • –targetargs “..\FluxDigital.Foundation.Accounts.Tests.dll” – the path to the dll your are testing again. This time for VSTest
  • –output “..\coverlet-cobertura1.cobertura” – the report file saved at the end of the test run.
  • –format cobertura – format for the above report file (this format allows us to merge the files from different test runs)
  • –include “[FluxDigital.]” – this paramater lets you filter out assemblies (dlls) and/or method to include by name. In my case I only want to include the CodeCoverage of dlls that start with “FluxDigital.” so this filters to just include these. I think you can actually add multiple include params if you wish (see below). 
  • –exclude “[]Model” –exclude “[FluxDigital.Foundation.Models]” –exclude “[]Controller*” – I’m not actually using these filters in my command above but if you want to you add multiple exclude parameters, e.g to exclude any Models or Controllers from Coverlet for example. 
  • –verbosity detailed – This tells Coverlet to output a lot of detail when running the code coverage, it’s really useful for debugging any issues.

I found some info here on include/exclude filtering and it was really helpful. Essentially patterns in brackets [my.dll.name] are assemblies and patterns outside of brackets “*my.class.name” are classes/methods.


Once it runs you will get a code coverage report which you will note is In the cultura format. The reason for this is that we want to merge all of our tests into one code coverage file and other formats don’t work for this. More on this later. 

You need to run a similar command (change the test dll and report name) for each test library and save the code coverage file out with a different name but in the same folder. In my case this was 9 test projects and therefore 9 code coverage files generated. Like so:

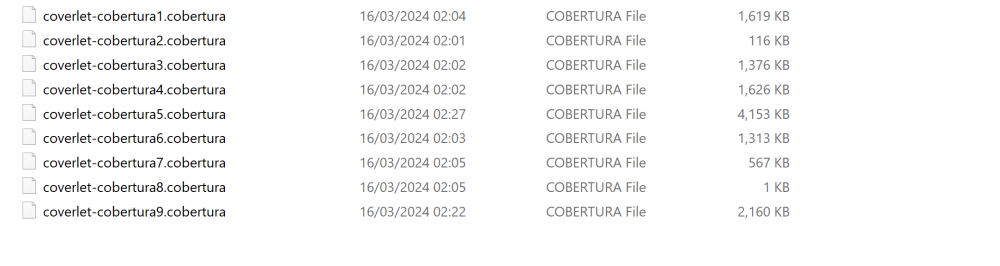
Running this 9 times in our build pipeline isn’t going to cut it, so you will see I solved this later using PowerShell to find all test dlls and run these commands automatically – but I wanted to explain how this works more simply first.

Report Generator

To merge them I used ReportGenerator. We will also use this tool later to upload the report to CodeCov. First we need to install it like so:

dotnet tool install -g dotnet-reportgenerator-globaltool

Then with the following command we can merge the files (ensure the path is correct to find your individual cobertura report files):

reportgenerator "-reports:C:\Projects\sc103-flux\coverlet\*.cobertura" "-targetdir:C:\Projects\sc103-flux\coverlet\report" -reporttypes:Cobertura

This gives us an Cobertura xml file with all code coverage data blended into one and generates an html report from it.

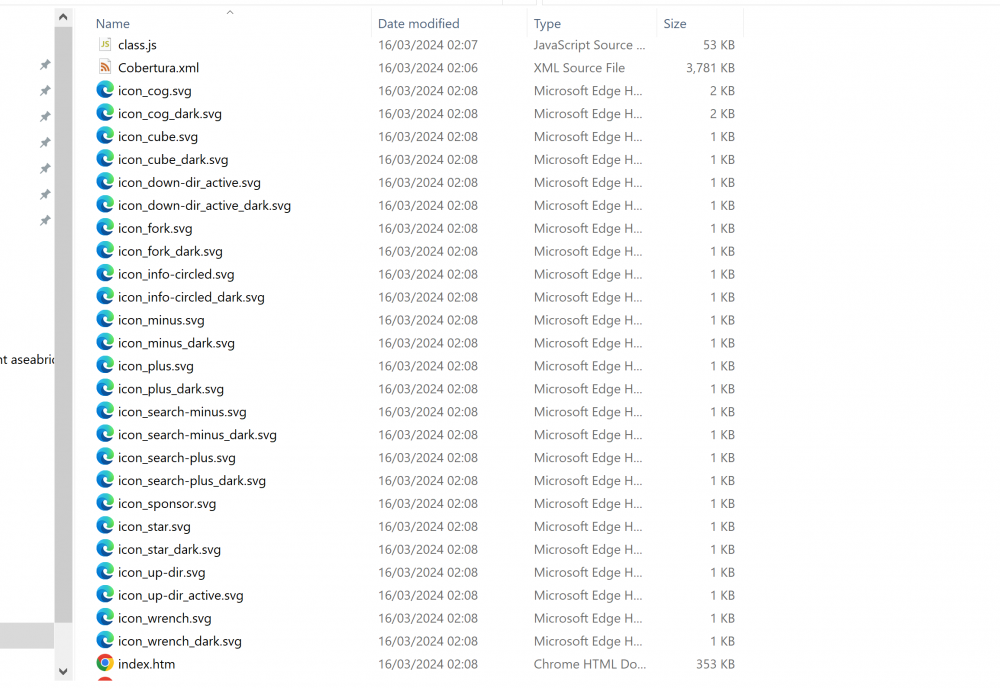
If you open up the index.html file in your browser you will see a summary of your Code Coverage at the top and then a breakdown by Assembly below that. Hmm 22%, not great at all. We have some work to do here to improve this, but that’s a job for another day.

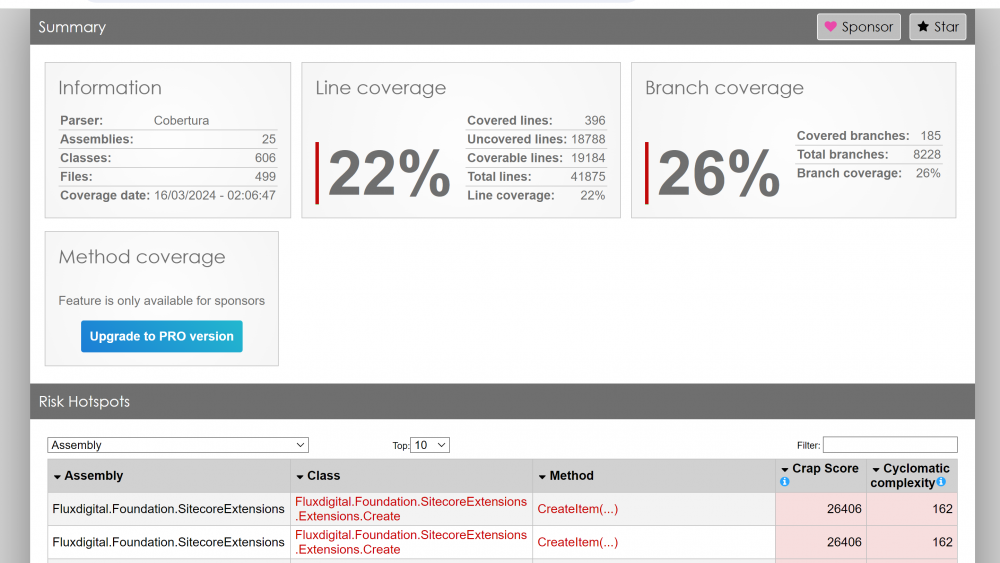
This report is pretty neat though and is already enough for you to see where the gaps are in your coverage so you can decide where you need to add more tests.

Putting everything into Github Actions

The next step is to run this in the build pipeline (in our case Github Actions) and use Report Generator to send the file to CodeCov.

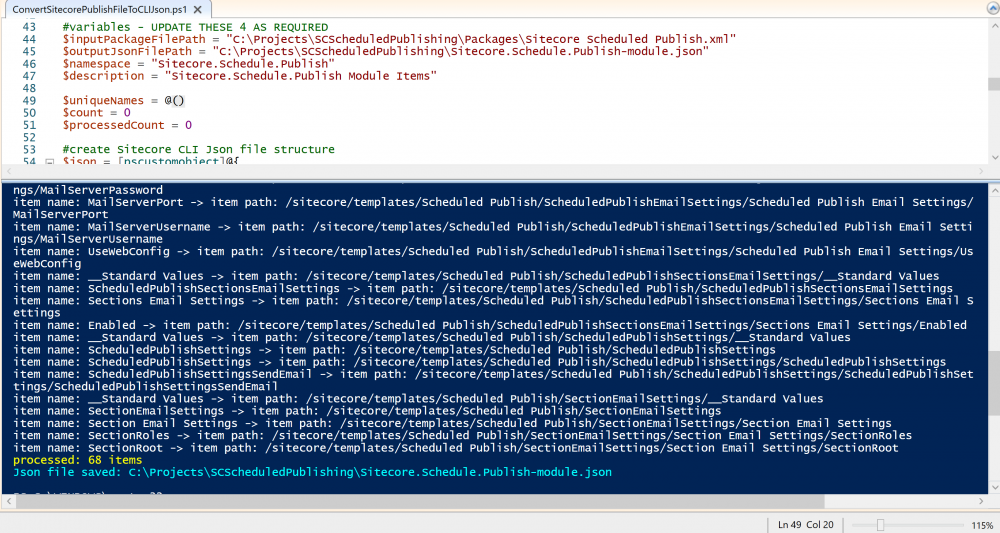
Running Coverlet via PowerShell for all Test Projects

A mentioned earlier in order to make this simpler to run in the build pipeline and maintainable I decided to write an PowerShell script which finds all test dlls that match a specific pattern (it ensures an unique list) and then executes the coverlet command (from above) for each dll in turn with VSTest Console.

This is what I came up with:

$basePath = "."
$reportPath = "coverlet"
$incNamePattern = "*Fluxdigital*test*.dll"
$incVSTestNamePattern = "[Fluxdigital.*]*"

#get all test dlls in the solution - filter here to reduce duplicates
$testdlls = (Get-ChildItem $basePath -include $($incNamePattern) -recurse | ? {$_.FullName -match 'Release' -and $_.FullName -notmatch 'obj' -and $_.FullName -notmatch 'LocalPublish'}).FullName 
        
#write-host "$($testdlls.Count) test dlls found..."
[System.Collections.ArrayList]$uniquedlls = @()

#ensure we only get each test dll once by adding them to an arraylist
foreach ($testdll in $testdlls){
    $fileName = [System.IO.Path]::GetFileName($testdll)
    #write-host "checking for $($fileName)"
    if($uniquedlls -match $fileName){
#write-host "allready in array"
    }
    else{
$uniquedlls.Add($testdll) | out-null 
    }
}

#run coverlet for each test dll in the list
write-host "$($uniquedlls.Count) unique test dlls found..."
foreach ($uniquedll in $uniquedlls){
$fileName = [System.IO.Path]::GetFileName($uniquedll)
$cmd = @"
coverlet $($uniquedll) --target "vstest.console.exe" --targetargs "$($uniquedll)" --output "$($reportPath)\coverlet-$($fileName.Replace('.dll','')).cobertura" --format cobertura --include "$($incVSTestNamePattern)" --verbosity detailed
"@
write-host "running tests for: $($fileName) - report path: $($reportPath)\coverlet-$($fileName.Replace('.dll','')).cobertura"
$($cmd) | cmd
}

This is used in the Github Action below so you will need to update the $incNamePattern and $incVSTestNamePattern to match your test dlls when using it in your Github workflow. You could obviously just use it locally to generate a report too.

The Final Github Actions YAML

In order to use Coverlet, VS Test, Report Generator in Github Actions I needed to add some steps in the build pipeline to install the tools. I also wanted to show the code coverage in the Github action summary so eventually found an market place action that would do that (and work with Windows runners) and then finally an action to send the report to Code Cov. Note you will need to update this action with your repo details and Code Cov token (in secrets).

Please review all the settings below too before trying this in your CI pipeline:

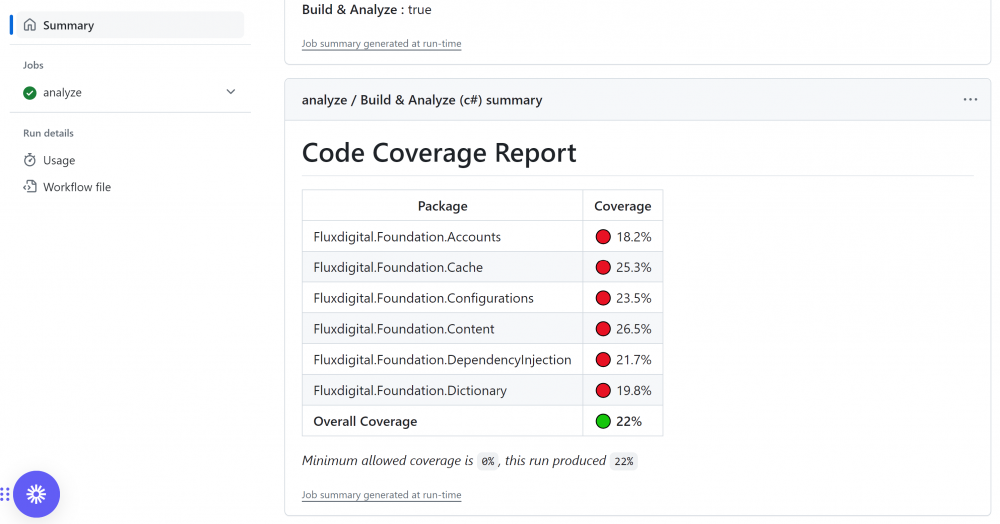
Just like running Coverlet locally from the command line you get a summary as it runs in Github too so it’s easy to debug any issues:

The report summary looks like so, pretty cool I think. You can configure this to work for PRs too if you wish.

Once you have this all working you may need to reduce the log levels so it’s not as noisy in the console.

Incidentally AltCover seems very clever and if you can get it to work correctly for you might be better than Coverlet, so give it a try also if you have time.

Hopefully this is useful for others who need to get Code Coverage setup for legacy Sitecore MVC projects (or other older .NET Framework projects). I’m sure a very similar approach would work in Azure Devops or other CI/CD platforms too. I’m off to write some more Unit tests.

As always there were a lot of useful links out there that helped me with this in addition to the ones I’ve included above:

https://blog.ndepend.com/guide-code-coverage-tools/
https://medium.com/@justingoldberg_2282/setting-up-code-coverage-with-net-xunit-and-teamcity-for-a-solution-with-multiple-test-projects-5d0986db788b

https://stackoverflow.com/questions/67058242/using-coverlet-with-net-framework-generates-an-error-the-expression-system-v

https://stackoverflow.com/questions/60707310/is-it-possible-to-get-code-coverage-of-net-framework-project-using-coverlet-in

https://stackoverflow.com/questions/60838586/how-to-output-code-coverage-results-file-of-solution-tests-to-solution-directory

https://stackoverflow.com/questions/62512661/how-to-generate-line-coverage-report-with-vstest-console-exe

Sitecore Page Exporter

Something I need to do regularly is pull down a page from an higher environment (such as UAT or Production) to my local machine or Test. I’ve done this in the past by manually building packages, using Sitecore Sidekick or SPE’s ‘Quick Download Tree as package’ option.

However the SPE’s package option does not support packaging up the datasource items (unless they are child items of the page). In my experience there are often global datasources that are not sub-items of the page. This can take quite some time to do manually, especially for large pages.

Enter Sitecore Page Exporter

So I decided to create ‘Sitecore Page Exporter’ using SPE which will handle this. It supports exporting a specific page as an package and optionally the datasources, images and sub-items. This is v1 so I plan to add more features in the near future.

Pre-requisites

You must have Sitecore PowerShell Extensions installed. This release has been tested with Sitecore 10.3 and SPE 6.4 but should work with older versions also.

Install Notes

  • Download the v1 package from the release link
  • Install the package using the Sitecore package install option in the Sitecore Desktop
  • You should now have Sitecore Page Exporter installed under the SPE module:

Usage

  • To export an page right-click the page in the Content Editor and choose: Scripts > Export Page as Package:
  • The following options are then available to you:
  • Choose your options and Click ‘OK’
  • Download and save the package
  • You get an overview of the export if you click ‘view script results’:
  • You will get an summary at the end of the number of items included also:
  • Upload the package to where you want to use the page (e.g your development machine)

Hopefully this is useful for others too. Let me know of any features you think might be added or any issues you have with this.

Automating Sitecore Azure SQL Database Maintenance

For a long time Sitecore have recommended that you run SQL Maintenance regularly and rebuild the indexes. However you can’t run maintenance plans like this (as you would in an On-Prem environment) in Azure.

So I did some research and it seems that Sitecore set these up for you if you using Managed Cloud. but I couldn’t find much further info on this.

However I did come across this SSE post with a very useful answer from Richard Hauer on using Azure Runbooks and PowerShell to run database maintenance.
There was unfortunately not a lot of detail on how to set it up or use it, I’d only really used Azure Runbooks once before for monitoring and re-starting Solr – so I am certainly no expert on this.

So having done this recently I thought I’d write this post to help others who need to do this, follow the steps below.

Step 1 – Create a new automation account

If you don’t have an existing Azure Automation Account you will need one so go to the Automation Accounts section in Azure Portal and create one.

If you have an existing Automation Account you can move on to Step 2.

Step 2 – Create Runbook & Add Script

Note: These need to be migrated to Extension Based Hybrid workers by August 2024. However Microsoft provide a simple approach to do this. I haven’t used these yet as I don’t have VMs available to run the workers but we will do this soon, so please bear this in mind.

Under Runbooks in the Automation account click ‘Create a runbook’:

Then and name it something like ‘Sitecore-DB-Maintenance-Plan-Workflow-RB’. Ensure you choose ‘Powershell Workflow’ as the Runbook Type – otherwise the script doesn’t work correctly:

Click on the Runbook you just created and choose ‘Edit in portal’:

Then paste in the script (see below):

This is the script to copy and paste. It’s modified version of the one Richard shared on SSE.
It includes more logging and comments. Note some of the additional logging shows up in the ‘All Logs’ section as is Verbose:

You can test this if you like in the test pane but once you are happy with it publish it.

Step 3 – Create Credentials

Now we need to add our SQL Admin user username and password as Azure Credentials. If you don’t have an existing SQL Admin user you can use then create one which has the access required to rebuild indexes.

Next add an new Credentials under the automation account by clicking ‘Add a credential’:

Add the credentials details like so called ‘DatabaseCred’:

Step 4 – Create Schedules

Now we need to create a schedule for each Sitecore database that we want to Re-Index. This will run the Runbook Workflow script on a schedule.

Under the automation account click ‘Add a schedule’:

Then add the Schedule details. For example the below is for the Master Database.

Sitecore recommend Indexing is done weekly and In my case we want to run it out of hours (3am) and not over a weekend of near a Monday (as that is the busiest day for this client). This may vary for you so adjust accordingly:

Repeat this for each Database you want to Re-Index. I setup schedules for the main databases: Master, Core and Web:

Step 5 – Link Schedules & Set Parameters

Now we need to link the existing Schedules to the Runbook. Go to the ‘Sitecore-DB-Maintenance-Plan-Workflow-RB‘ Runbook and click ‘Link to schedule’:

Then select the Runbook Schedule by clicking ‘Link a schedule to your runbook’:

And select a schedule from those you setup previously at Step 4.

Then click ‘Configure Parameters and run settings’:

Set the parameters like so for the SQLServer, Database and CredentialsName like so. Use the Credentials you setup at step 3:

Step 6 – Set up Logging & Alerts

Under the runbook ‘Logging and tracing’ turn on ‘Log verbose records’ like so:

You can setup alerts if you would like to for errors under the automation account by creating an alert rule and filtering on the Runbook logs:

Step 7 – Test and check Logs

Once the Runbook schedule has run you can check the output under the ‘Jobs’ section of the runbook:

Check the ‘All logs’ section too and you should see more information such as how fragmented the tables were and the number of fragmented tables found:

That’s it, you should now have a working Runbook Workflow that automates the re-indexing and prevents your databases from becoming slow. Hopefully this is useful for others too.

Here are some other useful links that I found to help with this:

https://gist.github.com/ivanbuzyka/70db190d540e34300dab5015f21d00bf

https://github.com/yochananrachamim/AzureSQL/blob/master/AzureSQLMaintenance.txt

https://segovoni.medium.com/automating-azure-sql-database-maintenance-tasks-overview-bdbadcb312bf

https://learnsitecorebasics.wordpress.com/2023/04/30/sitecore-commerce-user-creation-takes-too-long-or-turns-into-timeout-error/

https://devjef.wordpress.com/2017/08/28/running-database-maintenance-on-azure-sql-db-with-azure-automation/

https://learn.microsoft.com/en-us/azure/automation/automation-runbook-output-and-messages

https://learn.microsoft.com/en-us/azure/automation/learn/automation-tutorial-runbook-textual

Bulk Enable/Disable Sitecore Users with SPE

We’re currently pretty close to completing an upgrade to Sitecore 10.3 for a client and during the go live process we needed to disable most of the users apart from a few admin users and then re-enable them again after go-live.

We have a lot of users in the system and so I turned to Sitecore PowerShell Extensions (SPE) to automate this process. Here is the script I came up with:

When you run the script it has a dialog which allows you to select if you would like to enable or disable users and to choose which Admin users you would like Exclude when running the Disable/Enable:

Obviously you don’t want to accidently lock yourself out of Sitecore by disabling the main sitecore\Admin user!, therefore I’ve put a check in for this to try and stop this happening:

Once the script has completed you will see a modal confirming the number of users Disabled/Enabled:

Then you will be shown a report showing a list of all the users that have been either Enabled or Disabled:

Note that as I unchecked the sitecore\testadminuser in the modal dialog it has disabled this user along with all the other non-admin users in Sitecore.

These screenshots are from my local dev environment, but I’ve tested this script on hundreds of users and it runs in a few seconds.

Hopefully it’s useful for others who need to do something similar and can be easily updated too.

Deleting IAR items from the Database & Content Editor warnings for over-written IAR Files

Having recently created an Sitecore 10.3 IAR Package for the Scheduled Publishing Module I needed to remove the files from the database as they were still there even though they are now in the .dat files I created.

In previous versions of Sitecore it was quite tricky to do this but luckily were using Sitecore 10.3 and the Sitecore CLI has been updated to allow us to delete specific items from the database with the itemres cleanup command.

The commands we need to run are as follows:

dotnet sitecore itemres cleanup -p "/sitecore/templates/Scheduled Publish" -r

 dotnet sitecore itemres cleanup -p "/sitecore/system/Tasks/Schedules/ScheduledPublishTask" -r 

 dotnet sitecore itemres cleanup -p "/sitecore/system/Tasks/Commands/ScheduledPublishCommand" -r 

 dotnet sitecore itemres cleanup -p "/sitecore/system/Modules/Scheduled Publish" -r 

 dotnet sitecore itemres cleanup -p "/sitecore/content/Applications/Content Editor/Gutters/Scheduled Publish" -r 

 dotnet sitecore itemres cleanup -p "/sitecore/content/Applications/Content Editor/Ribbons/Strips/Publish/Scheduled Publish" -r 

 dotnet sitecore itemres cleanup -p "/sitecore/content/Applications/Content Editor/Ribbons/Chunks/Scheduled Publish" -r 

 dotnet sitecore itemres cleanup -p "/sitecore/system/Field types/Custom Field Types" -r

It’s possible to run these commands using the ‘what if’ flag (-w), to see what would happen if you ran them which is quite handy for testing them first. You will see a message saying that no changes will be made:


Note that unfortunately It’s not possible to run the ‘what if’ if not providing a path. It seems this might be coming in 10.4:


Once you’ve run the commands properly (without the -w switch) then you will see confirmation that the item(s) were removed like so:

The next step was that I wanted to check the above deletes have worked correctly and that all the items were indeed coming from the IAR files and not from the database.

I decided an Content Editor warning would be a good way of doing this, I have created these using SPE before so had a look around and found this really useful post from Jan Bluemink on doing this for IAR files. It mostly worked ok but the code that was share had some issues with the formatting and I wanted to make some improvements. Here is my updated version:

Note: to use this you need to ensure that your script library is configured as an ‘PowerShell Script Module’, that the integration points for Content Editor Warnings are enabled and the script placed in the correct sub-folder (Warning).

The script displays an Content Editor blue Info message if an item is coming from an IAR file and hasn’t been over-written like so:

And if it has been over-written (is coming from the database) then it shows an orange warning message like so:

This was really useful for confirming that the IAR files were working as expected. I actually set this up before running the cleanup commands above so that I could check I was getting the Orange message initially and then the Blue one after running the cleanup commands.

You can test this yourself if you like by opening this item in Content Editor: /sitecore/system/Marketing Control Panel/Taxonomies/Campaign group

This item comes from the item.master.dat file out of the box.

Another helpful tool is this SPE report that Jan Bluemink created, it lists all over-written IAR file items from a .dat file.

Hopefully this is useful info for anyone else who needs to cleanup IAR files and check the cleanup has worked correctly.

Below are some other useful links I found when working on this:

https://doc.sitecore.com/xp/en/developers/103/sitecore-experience-manager/work-with-items-as-resources.html
https://uxbee.eu/insights/items-as-resources-by-sitecore-part-3
https://jeroen-de-groot.com/2022/01/05/remove-items-from-resource-file/
https://gist.github.com/michaellwest/13e5a49b34340b9ebebdb83ff2166077

Convert Publish files to Sitecore CLI JSON format


I’m currently working on an Sitecore upgrade for a client and this week I needed to upgrade the Scheduled Publishing Module to be compatible with Sitecore 10.3. And whilst the code had been upgraded recently by Nehemiah Jeyakumar, there was no package for it still.

I was really keen to use an Item as Resource File (IAR) version, but to do so I’d need an Sitecore CLI JSON file which I didn’t have. There was however a Package.xml file which was used to create previous Sitecore Packages for the module.

I wondered if I’d be able to use this to create an Sitecore CLI JSON file but couldn’t find anything online that anyone had done. So I decided I’d write a PowerShell Script to do this for me. You can find this below:


The script essentially loads each x-item entry in an Package.xml file, calculates the item path and name and then generates and JSON file in the Sitecore CLI Serialization format and saves it to disk for you.

How to use it

Open the script in PowerShell ISE on your PC and update the 4 variables below.
The $inputPackageFilePath should be your existing package file and $outputJsonFilePath where you would like to save the JSON file. The namespace and description should reflect your module.

variables - UPDATE THESE 4 AS REQUIRED
$inputPackageFilePath = "C:\Projects\SCScheduledPublishing\Packages\Sitecore Scheduled Publish.xml"
$outputJsonFilePath = "C:\Projects\SCScheduledPublishing\Sitecore.Schedule.Publish-module.json"
$namespace = "Sitecore.Schedule.Publish"
$description = "Sitecore.Schedule.Publish Module Items"

Once you have update these variables you can run the script and all being well you will get a JSON file saved out as specified. You should see an output similar to below with a summary of the number of items created and the location of the JSON file:


You should see that the script will automatically work out which database the item should be put into (from the package path) e.g Master or Core.
Note: The script currently sets all items as ‘SingleItem‘ scope and ‘CreateUpdateAndDelete‘ for allowedpushoperations, so you may want to adjust some of these manually.

After that you can just run the serialize command from your Sitecore Solution folder like so:
dotnet sitecore ser pull

And then the run the Item as Resource command to create one or more .dat files with the items included:
dotnet sitecore itemres create -i Sitecore.Schedule.Publish  -o SCScheduledPublishing\src –overwrite


I have a blog post here with some more info on these steps actually (it’s for an older version of the CLI but will work fine): https://www.flux-digital.com/blog/creating-custom-items-resources-sitecore-cli-4-0/

Hopefully this is useful for others who need to do this for a module.

Indecently if you need an Sitecore 10.3 version of the SCScheduledPublishing module you can find an normal and IAR package for 10.3 here: https://github.com/nehemiahj/SCScheduledPublishing/tree/main/Packages

My Sitecore SUGCON 2023 Takeaways – Day 2

> DAY ONE - If you haven't read about Day One you can read it here.

SUGCON DAY 2

IMG_0478

The 2nd Day of SUGCON started bright an early so after a quick breakfast and cup of tea at the hotel I headed down to the first session I’d planned to see.

Rob’s session is one of the key sessions I really didn’t want to miss this year. A few clients I’ve spoken to recently (and other Sitecore Dev’s I’ve chatted to at SUGCON so far) are facing this challenge:

‘How do we move to XM Cloud from XP and what do we need to consider?’

– so I was keen to learn from Rob’s experiences.

Migrating advanced Sitecore implementations to XM Cloud – Rob Habraken

rob-xm-cloud-banner

Rob started with telling us the differences with XM Cloud and explaining how publishing works differently (given you publish to the Edge):

IMG_0638
IMG_0640

Rob then shared a typical XP implementation diagram and showed how XP Differs as integrations and functionality is moved into the head application:

IMG_0642

He then discussed what is included and not included in XM Cloud in detail. Martin shared some similar slides the day before, but I think these were a little clearer so I didn’t include them in the previous post:

IMG_0644
IMG_0645

This was also a pretty cool comparison of XP vs XM Cloud equivalent features:

IMG_0646

Rob then discussed the Migration approach to XM Cloud. There was a lot of really useful info here about things to consider and how to get your project prepared for the migration and how to tackle it:

IMG_0648
IMG_0649
IMG_0650
IMG_0652

IMG_0653

Next up was the the different development approaches and workflow. I’ve talked about these before but I didn’t know much about option 3 at all. I guess most Sitecore developers (especially in a small team) will use option 1, but option 3 is a really good approach for being able to use local content for your development without having to push it to XM Cloud:
IMG_0654
IMG_0655
IMG_0656
IMG_0657

Rob then went on to explain in detail about how Content Resolvers don’t work if they are dynamic and only static ones do. It’s possible to use some out of the box ones or implement your own GraphQL Content Resolver:

IMG_0659
IMG_0662
IMG_0663
IMG_0664

This is an example of Bread crumbs in XM Cloud and a GraphQL search query:

IMG_0666

IMG_0667

Rob finished his talk with a summary of the benefits of XM Cloud. The shift in Development domain and thinking is the tricky part for a lot of Sitecore Developers I feel:
IMG_0668


Rendering your data in headless – 101 different ways
– Mike Edwards

mike-headless-banner

I’ve known Mike for a number of years now and he’s always an good speaker so I was looking forward to Mike sharing his learnings from his headless journey.

IMG_0673
IMG_0674

Mike started by lamenting how things used to be easy in the World of MVC and server-side development and then with all the JQuery and JS frameworks things became pretty bloated.

Things have moved on a lot now in FE development though and there are now many different options for building Headless websites in Sitecore, some of these I’m aware of or have experimented with – Others I’ve not heard of, such as ‘Island Architecture’.

IMG_0674
IMG_0676
IMG_0677
IMG_0678

SPAs bring their own set of problems in terms of page load times and indexability so Mike went into Hydration and Partial Hydration techniques and approaches that try to solve these issues:

IMG_0679
IMG_0680

Then Mike explained more about Partial Hydration examples and Island Architecture. Island Architecture lets you create your web app with pure HTML and CSS for all the static content but then add in regions/placeholders of dynamic content to support interactive ‘islands’ of content. Given the rest of the page is static it downloads really quickly and is available to use faster.

IMG_0681
IMG_0683

Mike then covered Resumability, Edge/Serverless and tools such as Storybook and Hydration Payload.

IMG_0684
IMG_0685
IMG_0686
IMG_0687

There are some Challenges and limitations which need to be re-address:

IMG_0689
IMG_0690
IMG_0692
IMG_0693

Finally Mike ended with saying that this is the future and we need to embrace the new world.
IMG_0694

It was a really interesting talk and gave me a lot to think about and research further. The following talks were 15 minute lightning talks until lunch.

Leverage Sitecore Connect for Sitecore CDP – Sarah O’Reilly

IMG_0695

I’d heard a fair bit about Connect but I’ve not really seen much about how it actually works. So I was looking forward to this session

Sarah took us through an example of using Connect to import user segment data from CDP into Google Ads.

IMG_0696 IMG_0703

Once the export was setup to build from CDP the steps were then configured in Connect to sync to Google Ads:
IMG_0712
IMG_0714

There are tons of Apps supported and different recipes defined and it was impressive to see the options for building logic such as if statements / for loops data mapping and manipulation all within Connect.

IMG_0709

This was an insightful session and really interesting to see how it works. I can see how it could be used to help with migrating to XM Cloud from XP or another CMS platform.

Sitecore components explained for your marketers – Ugo Quaisse

The next session was about the Sitecore Components builder in Pages in XM Cloud. I’ve heard a bit about this but not seen much of it in detail. I was hoping to see a full demo of it. I guess at the session was only 15 minutes there wasn’t time, but I still learned quite a bit about how it works.

IMG_0715
IMG_0716
IMG_0717
IMG_0719

The Component Builder can be used without any development or code required at all. First Themes are setup with colours, fonts and breakpoints configured.

Then datasources are setup and mapped from either a url or json or GraphQL.

IMG_0720

Then the components ‘look and feel’ – layout, dimensions and sizing can be configured in the Builder. This looks pretty neat. Then versioning and publishing is setup for the Component.

IMG_0721

IMG_0722

Lastly some details were shared around the benefits for digital creatives, it’s possible to get Sites built very quickly and easily using Components Builder.

IMG_0723
IMG_0724
IMG_0726
IMG_0727


Leveraging XM Cloud APIs and Webhooks to powerup integrations – Ramkumar Dhinakaran & Elakkuvan Rajamani

IMG_0740

After lunch it was time for another session, this time on Webhooks. The use-case here was the XM Cloud Lighthouse Integration which would do an automated quality check of pages using Webhooks and report on it.

IMG_0731

IMG_0742
IMG_0745

Depending on the integration required it might not be best to use a Webhook:
IMG_0756
IMG_0758

Quite a lot of detail was shared with how this all works and integrates.

IMG_0735
IMG_0736
IMG_0737
IMG_0747

There were some links and takeaways shared at the end.

IMG_0763


Sitecore Search: Real case PoC – Sebastian Winslow & Jesper Balle

IMG_0766

The 2nd to last session for the day was on the Sitecore search (based on Discover) which I was keen to learn about more as I didn’t know much about how it worked.

IMG_0770
IMG_0772
IMG_0773

CEC looks pretty powerful and can be used to manage search, performance is key and widgets can be configured for search and catalog:

IMG_0774
IMG_0776
IMG_0778
IMG_0779

Some dev resources and admin info were shared:

IMG_0780
IMG_0782

The use case for search was a property Site. There is still some features that need to be built.

IMG_0783
IMG_0785
IMG_0789
IMG_0790

Some info was then provided on Triggers to get the content, Request and document extractors to process and manipulate the content.

IMG_0791
IMG_0792
IMG_0793
IMG_0794

Search API endpoints, results response, API Explorer and ability to refine the widgets.

IMG_0796
IMG_0798
IMG_0799
IMG_0801

It’s early days and the search SDK is still not there yet but it’s coming. Be careful with how much content you try and index when testing but there are some significant benefits to using it.

IMG_0803
IMG_0805

This was a really informative session and gave me all the info I was looking for about how to go about implementing search.

Experiences with Content Hub One – Journey of relaunching our Usergroup website – Katharina Luger & Christian Hahn

IMG_0807

Then it was time for my last session of the day on how the Sitecore User Group Germany rebuilt their site as an SPA using Content Hub One.

The slide below was probably the simplest comparison I saw all SUCON of the differences between XM Cloud and Content Hub One.

IMG_0808
IMG_0811
IMG_0816
IMG_0818

There are 7 Steps to component creation:

IMG_0821
IMG_0822
IMG_0823
IMG_0824
IMG_0825
IMG_0826
IMG_0828

Lastly there were some challenges faced.

IMG_0831

This was a really great session and I’m looking forward to working with Content Hub One in the future.

Virtual Closing Keynote by Scott Hanselman

IMG_0833

There was then an really entertaining and insightful talk from Scott Hanselman. He had some great advice, wisdom and stories to tell to us and I think everyone in the room was pretty captivated by his talk.

IMG_0848

With that it was the end of SUCON 2023, there was a big round of applause for all the organisers. These events take a hell of a lot of organising and a real commitment from everyone involved.


IMG_0855

It was time to go and have a few beers and reflect on what was a another brilliant SUGCON.

IMG_0862
Hopefully this is useful info for anyone that couldn’t attend this year or had too many beers and forgot what they learned :-).

Sitecore Technology MPV Award 2023

mvp-banner-2023-narrow

This week I was privileged to be presented with the Sitecore Technology MVP award for the 6th year in a Row .

There are only 241 MVPs Worldwide and just 8 Technology MVPs in the UK (137 Worldwide), all of which have been awarded for:

“demonstrating outstanding engagement and support for the global Sitecore community”.

It’s a great Community to be involved in and I’ve enjoyed organising and presenting at the Manchester Sitecore User Group over the past year, meeting other Sitecorian’s and sharing my knowledge on this Blog, YouTube, Twitter, SSE and Slack.

You can see all the 2023 MVPs in the Directory here: https://mvp.sitecore.com/Directory

Why become an MVP?

There are many benefits to being an MVP, here are some of them:

  • Being viewed as a global Sitecore expert & community leader
  • Access to early product release / resources / product teams and kick-off webinars
  • Access to MVP discussion forums
  • Regional MVP meetings
  • MVP Summit after Symposium (insight to product / company strategy)
  • Discounts for SUGCON & Symposium

You can read more about the MVP programme here.

Thinking about becoming an MVP?

This is a really useful SSE post on the kind of activities you need to be involved in if you would like to become an Sitecore MVP and this Blog Post is a great resource.
You can also reach out to previous and existing MVPs on Twitter/Slack etc and I’m sure they will help guide you or answer any questions you have.

There is also an mentor programme which may be something to look at if you feel you need further guidance and help on your Journey.

Congrats to all 2023 MVPs and thanks to Sitecore and the MVP Team for their support and assistance over this year. Here’s to another year of Sitecore’ing ?.

Using ChatGPT to write SPE

chatgpt-spe

Catchy title huh? it Rhymes and everything.
Anyway, my Twitter timeline has been non stop about ChatGPT this, and ChatGPT that for the past few weeks – and I’ve seen it doing some pretty cool stuff.

I also keep hearing how it’s going to make Software Developers redundant, so it got me thinking about something I do every few days as a Sitecore Developer:

“Can ChatGPT write some decent Sitecore PowerShell Extensions scripts?”


TLDR:
Yes it can. Not terrible anyway. Read on to find out more.

Wait, what is ChatGPT?

Chances are that you already know what it is else you probably wouldn’t be reading this, but just in case – ChatGPT is an impressive AI Chatbot created by OpenAI (backed by Microsoft & others) that can take inputs and provide some very comprehensive and usually pretty accurate answers.

The Tests – How did ChatGPT do?

So I fired up my browser, created an account on https://chat.openai.com/ and after waiting for it to become less busy for a while, I got started with asking for some SPE scripts:

chatgpt-busy

ChatGPT Test 1 – Create me an Sitecore item

I thought I’d begin with something fairly simple – creating an item, it seemed like a nice place to start. It’s often something I need to script (perhaps usually to create a bunch of items). This is what came back:

spe-create-item-chatgpt

My Score = 6/10

Other than the fact it seems to have tried to import SIF at the top of the script!?, Initially I was quite impressed as it looked pretty close to what I would write myself.
However when I tried to run the script in the SPE ISE (using the Sample Item Template Id) it was clear that it had some of the parameters incorrect. It had miss-understood how to use the -ItemType and had also tried to pass -Template in as a parameter and there is no such thing so it wasn’t quite right but not a bad effort. After correcting these issues this is the final working script:


ChatGPT Test 2 – Unlock all Items for a User

This time I went for something a little more tricky, unlocking items is something I’ve quite often need to do in the past – where users have gone on Holiday and left an lot of items locked for example. Here is what it came up with: spe-unlock-items-chatgpt

My Score = 9/10

Again it tried to import SIF at the top of the script, but other than that it actually created some working code. Amazingly similar to Marek’s SSE answer:

spe-unlock-sse

I was able to just remove the SIF imports at the top and run it and it seemed to work. It took a while (as I have  a lot of test content locally) and there is no logging to show what happened but it didn’t error and did complete. Here is the working script:

ChatGPT Test 3 – Remove all old versions of an Item

This time I tried something I’ve had to do recently and took quite some time to write as was fairly complex. I wanted a script to remove all but the 10 most recent versions of an item but to always keep item versions that are 3 months old or less as well. Here is the script it came up with:

spe-delete-item-versions-chatgpt

My Score = 3/10

These more complex scenarios and perhaps where ChatGPT starts to fall down a bit. It has tried to build two list (one of old versions and one of recent versions) and then remove the versions from the item and then add back the recent and old versions in memory.
This won’t work as it’s not updating the item itself and it’s not possible to set the Versions property on the item like this (instead $itemVersion| Remove-ItemVersion should be used). The logic is also not quite right here for sorting and filtering the versions. If you compare my script linked above there is quite a lot missing and wrong here due to the nuances with Sitecore item versions.

ChatGPT test 4 – Create me a package with a UI

A final test is also a task I’ve implemented recently. The scenario was a bit more complex than this but I thought I’d see how it got on with something similar:

spe-create-package-chatgpt

My Score = 2/10

The script created here isn’t great to be honest. It didn’t quite get the properties correct for the Treelist UI. It has created the Package ok but the Add-ItemToPackage method does not exist, it should instead be using New-ItemSource.
Similarly it seems to have made up a function called Save-Package which should instead be Export-Package. Lastly it’s tried to offer me an link to the package to download it, which won’t work as it needs to either be an link to the default packages folder or use the Download-File option instead to present it to the user to download.
Interestingly when I tried to re-word my instructions to see if I could get it to use the Download-File method it actually tried to add items in a different (but still incorrect) way and tried to use the inbuild .NET Framework methods to download the zip to my browser which won’t work in the context of SPE ISE:

spe-create-package2-chatgpt

Conclusion

So am I worried I’ll be surplus to requirements anytime soon? In short – not currently no. The average of my (not so scientific test) was 5/10.

I think the nuances of a complex platform like Sitecore are hard for an AI powered tool to fully understand to an extent where it can automate code to an good-enough standard currently.

However, I think it could be a great starting point for an SPE script, especially for stubbing out the basics of something. It could also be really useful if Google or SSE fails you and you just can’t find any example code for a task you are working on. It is also very impressive that it can interpret what I’m asking for so well and write some half decent code.

I am not exactly sure how it works, but I’m guessing it’s injesting information from Sitecore Blogs, SSE, Sitecore Documentation Sites and reading the Dlls/Code online, as well as taking learning input from trainers and end-users.

If so then over time it’s going to become better and better and writing code and eventually I might be down the Job Centre wondering what happened.
If it manages to absorb Mark Kassidy’s brain then we will all be in Trouble…

XM Cloud Demystified

xm-cloud-banner

I had heard a lot about XM Cloud over the past year or so at SUGCON and from Symposium as well as from the Sitecore Community, however I realised I didn’t really know that much about it still and wasn’t clear on what was included.

Given that XM Cloud was officially released for general availability at Symposium it was about time I learned about if properly and answered some of the questions I had.

So I dived into the XM Cloud documentation and watched a lot of Videos and setup the local XM Cloud instance to learn more about it. I then decided I’d try and speak at the next Sitecore user group in Manchester on XM Cloud to share what I learned. Nothing like a deadline to force you to learn about something properly huh? :-).

You can see the Slides and Video of my presentation ‘XM Cloud Demystified’ below.

Update: You can see an more recent talk I did on XM Cloud at the Columbus Sitecore User Group back in March which is clearer, newer and more in-depth too: https://www.youtube.com/watch?v=8yw0kNrh-f4

In my presentation I talk about:

  • What XM Cloud is
  • The benefits of XM Cloud
  • What is included and what is not
  • How it compares to Sitecore XP
  • Where it fits in with the new SaaS products Sitecore has acquired and developed
  • The different development and deployment approaches
  • Show how XM Cloud looks and Demo my local Instance

What’s Included?

In my research one thing I couldn’t find was a list (or diagram) of everything that is included in XM Cloud. So I put together a list on one of my slides (see my Slides below), however I really wanted to create a diagram of this. I didn’t get chance to before my talk but I’ve now created one which you can see below.
I’m sure it’s not as fancy as Sitecore would have done but it’s pretty clear I think.

Update: after some feedback from Pieter Brinkman on Linked In I’ve updated the diagram a little. Sitecore search is not included, it is instead available as an add-on. XM Cloud Forms Builder is also a Roadmap feature. I’ve also added SPE and Automatic updates to the diagram.

xm-cloud-whats-included-v2

Slides of Presentation

Here are my slides from the SUG (see the Video of my presentation below).

Video of Presentation

Here is the Video of my Talk. Click the video below to jump to my presentation.

Update: You can see an more recent talk I did on XM Cloud at the Columbus Sitecore User Group back in March which is clearer, newer and more in-depth too: https://www.youtube.com/watch?v=8yw0kNrh-f4

I leaned a lot from my research and hopefully this is useful for people looking to get an clear over-view of XM Cloud. If you want to know more the developer docs have lots of information.

If there is anything I’ve missed or got wrong then please let me know on Twitter or in the comments so I can correct it as I’m still learning about XM Cloud and things are changing all the time.

While your here check out the rest of the SUG as well as we had some other great talks too.