Scripting Sitecore Packages with SPE

gandalf

This week I needed to automate the creation of a package to include a number of items that we want to backup before syncing content down from other environments. I needed to conditionally only backup certain test pages and components based on name.

I figured I’d be able to do this with Sitecore PowerShell Extensions and it turns out you can.

Here is a script based on the one included in SPE (/sitecore/system/Modules/PowerShell/Script Library/SPE/Core/Platform/Development/PowerShell Extensions Maintenance/Prepare Console Distribution).

The script creates a package with two sources:

  • Test Pages – pages within a specific folder
  • Test Components – matches components in sub-folders that have a specific name (sub-folders that start with ‘Test’)

It then provides the package for you to download like so:
spe-package


To use this script update the meta data section at the top and the paths to include your own pages and components. Check the InstallMode param is correct for what you want to do and also the filters for component name matches what you need, update it if not. You could include additional sources too by duplicating the $source = ‘x’ and $package.Sources.Add($source); lines.

Hopefully this is useful for others that need to do this in future.

Creating Sitecore Items with a Specific ID with SPE

I recently needed to re-create an item that had been deleted by accident and was no longer available in the recycling bin or anywhere else. However this item needed to be created again with the same Id to avoid a lot of re-configuration.

I figured I might be able to do this with SPE (Sitecore Powershell Extensions) and after some digging it turns out there is a ForceId param supported by the ‘New Item‘ function that I hadn’t come across before.

It can be used like so – note: the -ForceId parameter that you will need to update to the Item Id you wish to use:

Once you’ve run this command you should see an item created with the Id you set as below:

add-item-with-new-id


I haven’t seen any other blog posts on this so hopefully it’s useful for anyone else who needs to do this in future.

Creating Microsites In Sitecore without SXA

dynamic-sites-globe2

I’ve not used SXA in anger but have heard good things about it. Unfortunately due to licencing and timeframes it was not an option for me on a recent project where I was required to recommend and deliver an mechanism for quickly creating Microsites in Sitecore.

TLDR: If SXA is not an option then Dynamic Sites Manager might be a good alternative for you.

This meant I had 3 options:

1) Manual Configuration in the Sitecore Config
2) Use a Sitecore Microsite Module (such as the Multiple Sites Manager)
3) Write something custom to support adding Microsites dynamically

Manual Config wasn’t really an option as I knew that we had a number of Microsites to add and having a more flexible approach with less work and maintenance involved was important. I also didn’t want to write something custom as I knew this would be a time-sink involving solving problems other people have already had to with one of the Sitecore Modules available.

Dynamic Sites Manager To The Rescue

After a fair amount of research and experimentation I decided upon an lesser known Module called Dynamic Sites Manager built by Pete Navarra. As we are using Sitecore 8.2 I decided to use this specific version (1.9.1) from Github.
This happens to be the most recent release of the Module. It does work with Sitecore 9.0 too.

Pete has written one or two posts on the Dynamic Sites Manager but during the setup and of the module and configuration of the various sites I learned some useful tips I thought I’d share. On the project I’m currently working on we have two Sites that are live using the Dynamic Sites Module so far and both are functioning well.
Pete was also really helpful on Slack fielding all my questions so I wanted to return the favour and blog about it.

Reasons I chose Dynamic Sites Manager

  • It’s been written for performance, it uses the Site Provider Pattern and doesn’t just hook into the HttpBeginRequest pipeline (like the Multiple Sites Manager does) – this can cause caching issues
  • Microsites an be added and (most) configuration implemented purely within Sitecore
  • Each Microsite has a number of settings that mimic native Sitecore config for a Site
  • Content for the Microsites can be created wherever you wish
  • Roles can be configured for Microsite content as normal in Sitecore
  • Existing Layouts, Components and functionality already created in Sitecore can be used in Microsites
  • The module works with Sitecore 8.2, has been around for a few years and has had 8 releases so is quite mature.
  • I tested the module with Sitecore 9.0 today and it works so when we upgrade to 9.x It should continue to work correctly.
  • The code is open source on Github so we can fork it and change anything if we need to
  • It has been battle-tested on large sites with 100s of Microsites

Installing the Module

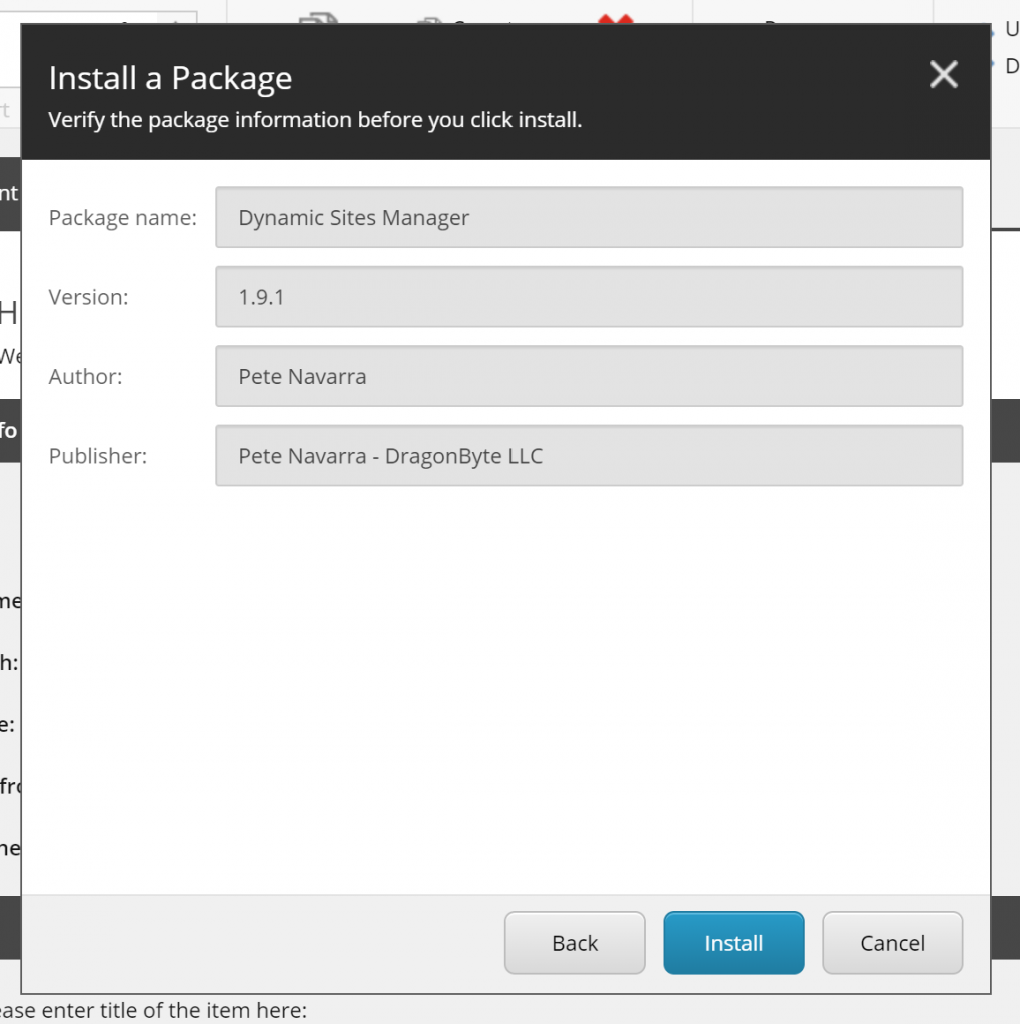
The first step is to download and install the Module. You can download it from the Market Place. The direct link for 1.9.1 is here.

Install the module using the package installation wizard as normal.

dynamic-sites-1.9-install-2

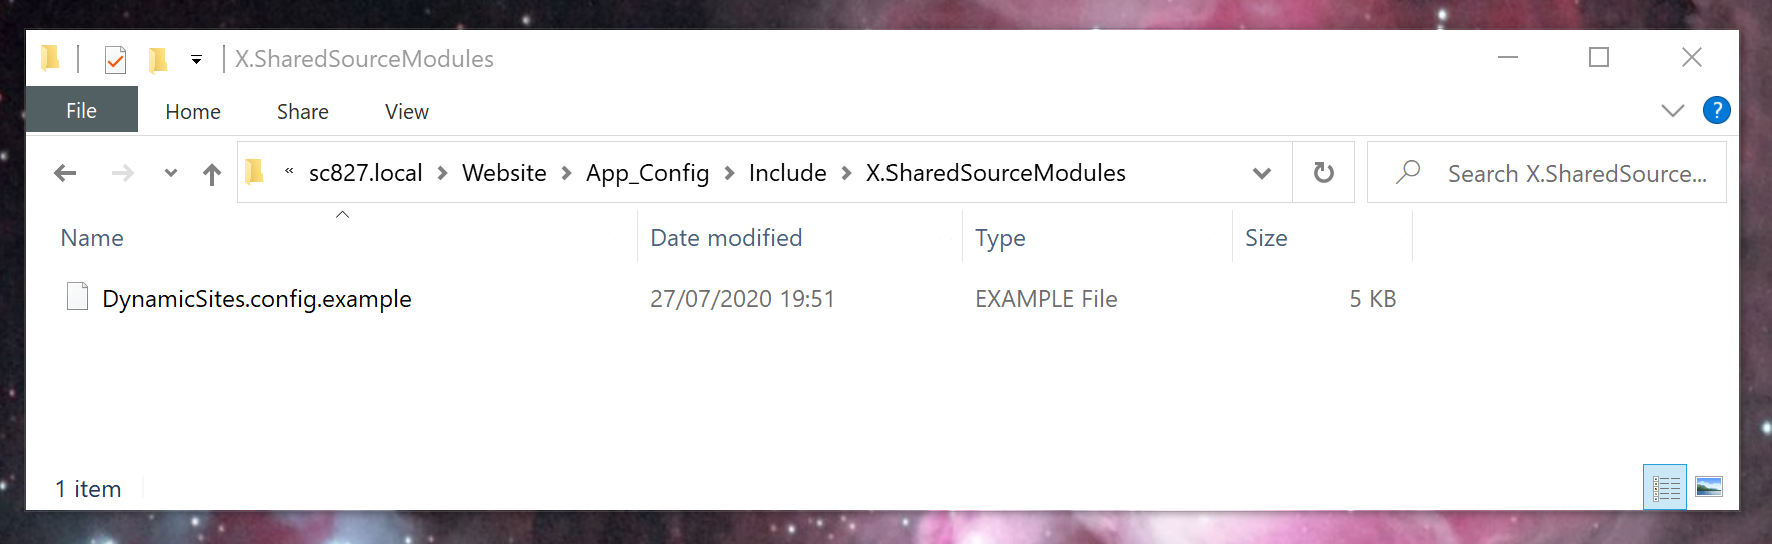
Once the module installation has completed open the DynamicSites.config.example config file  here: /App_Config/Includes/X.SharedSourceModules and rename  to DynamicSites.config.

dynamic-sites-1.9-install-3


This will enable the module and configure the default settings for the module, as defined at the top of the file this config file adds:

1) Event Handlers to Update Custom Chosen Templates with Dynamic Sites Base Template
2) Site Providers for both Dynamic Sites as well as a Switcher Provider.
3) Dyanamic Site Default Settings. All Dynamic Sites will inherit from these default properties.
4) 4 Sitecore Settings.

I’d recommend leaving this as it is for now and coming back to tweak settings if you need to.

Module Configuration

The next steps are to configure the module settings within Sitecore and create your first Dynamic Site.

You can set some general settings if you wish for the module here: /sitecore/System/Modules/Dynamic Sites/Dynamic Site Settings. You will probably find you can just leave most of the default settings here ‘as is’.

One thing you may want to consider doing is updating the Site Definition Template. The dropdown highlighted below allows you to set a custom template as the Site Definition template. This adds a Dynamic Site Definition Base template to the item and allows site configuration to occur on the item level:

dynamic-sites-1.9-install-4

This will likely be if you wish to customise the configuration settings in future.

For now you can just continue with using the Site Definition Template that ships out of the box with the Module.

Creating A Dynamic Site

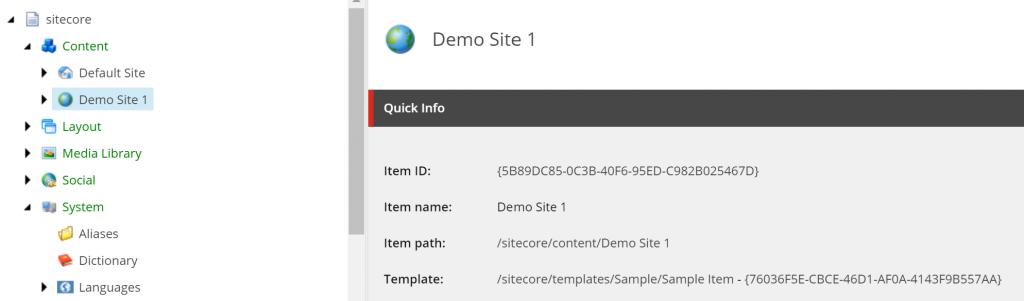
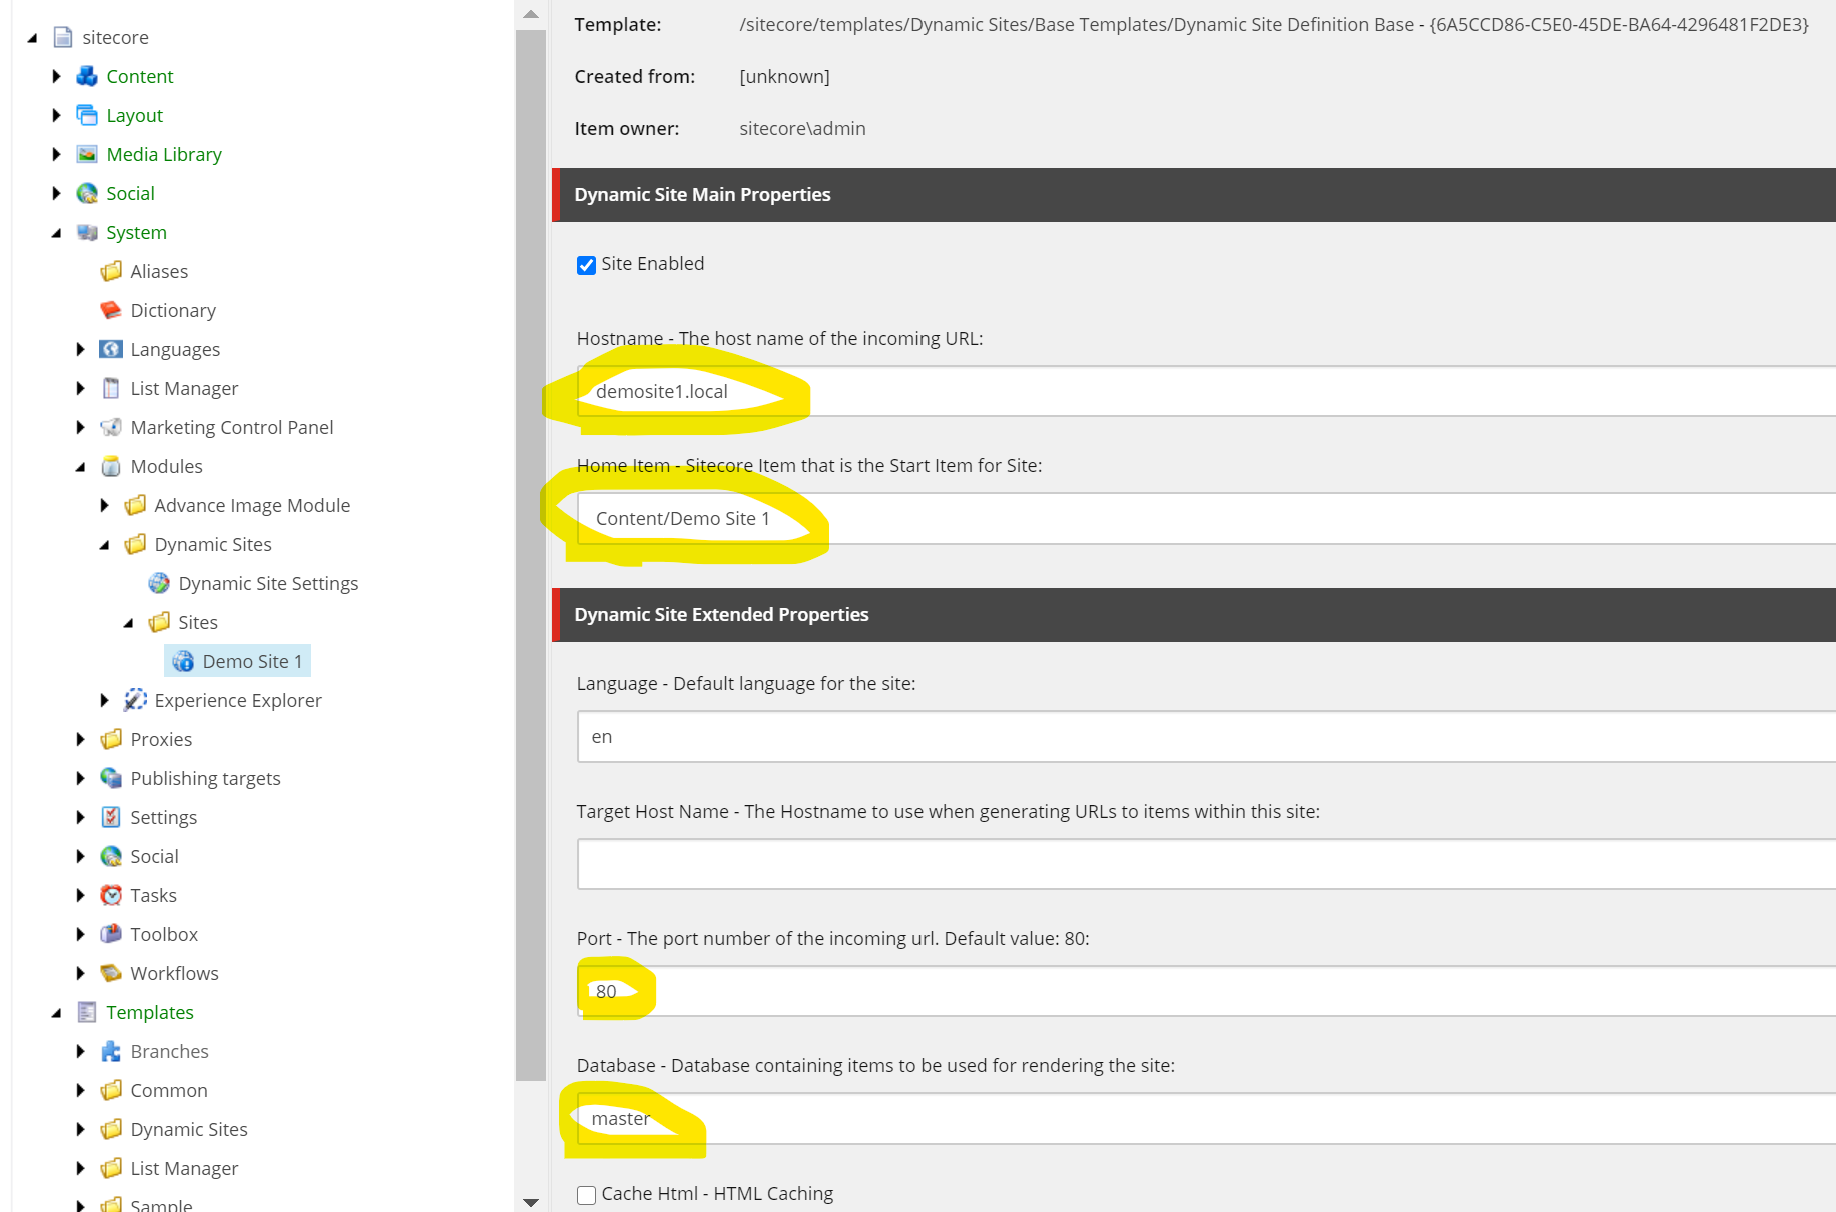
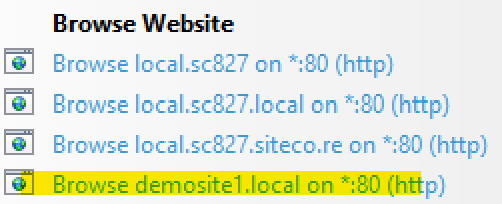
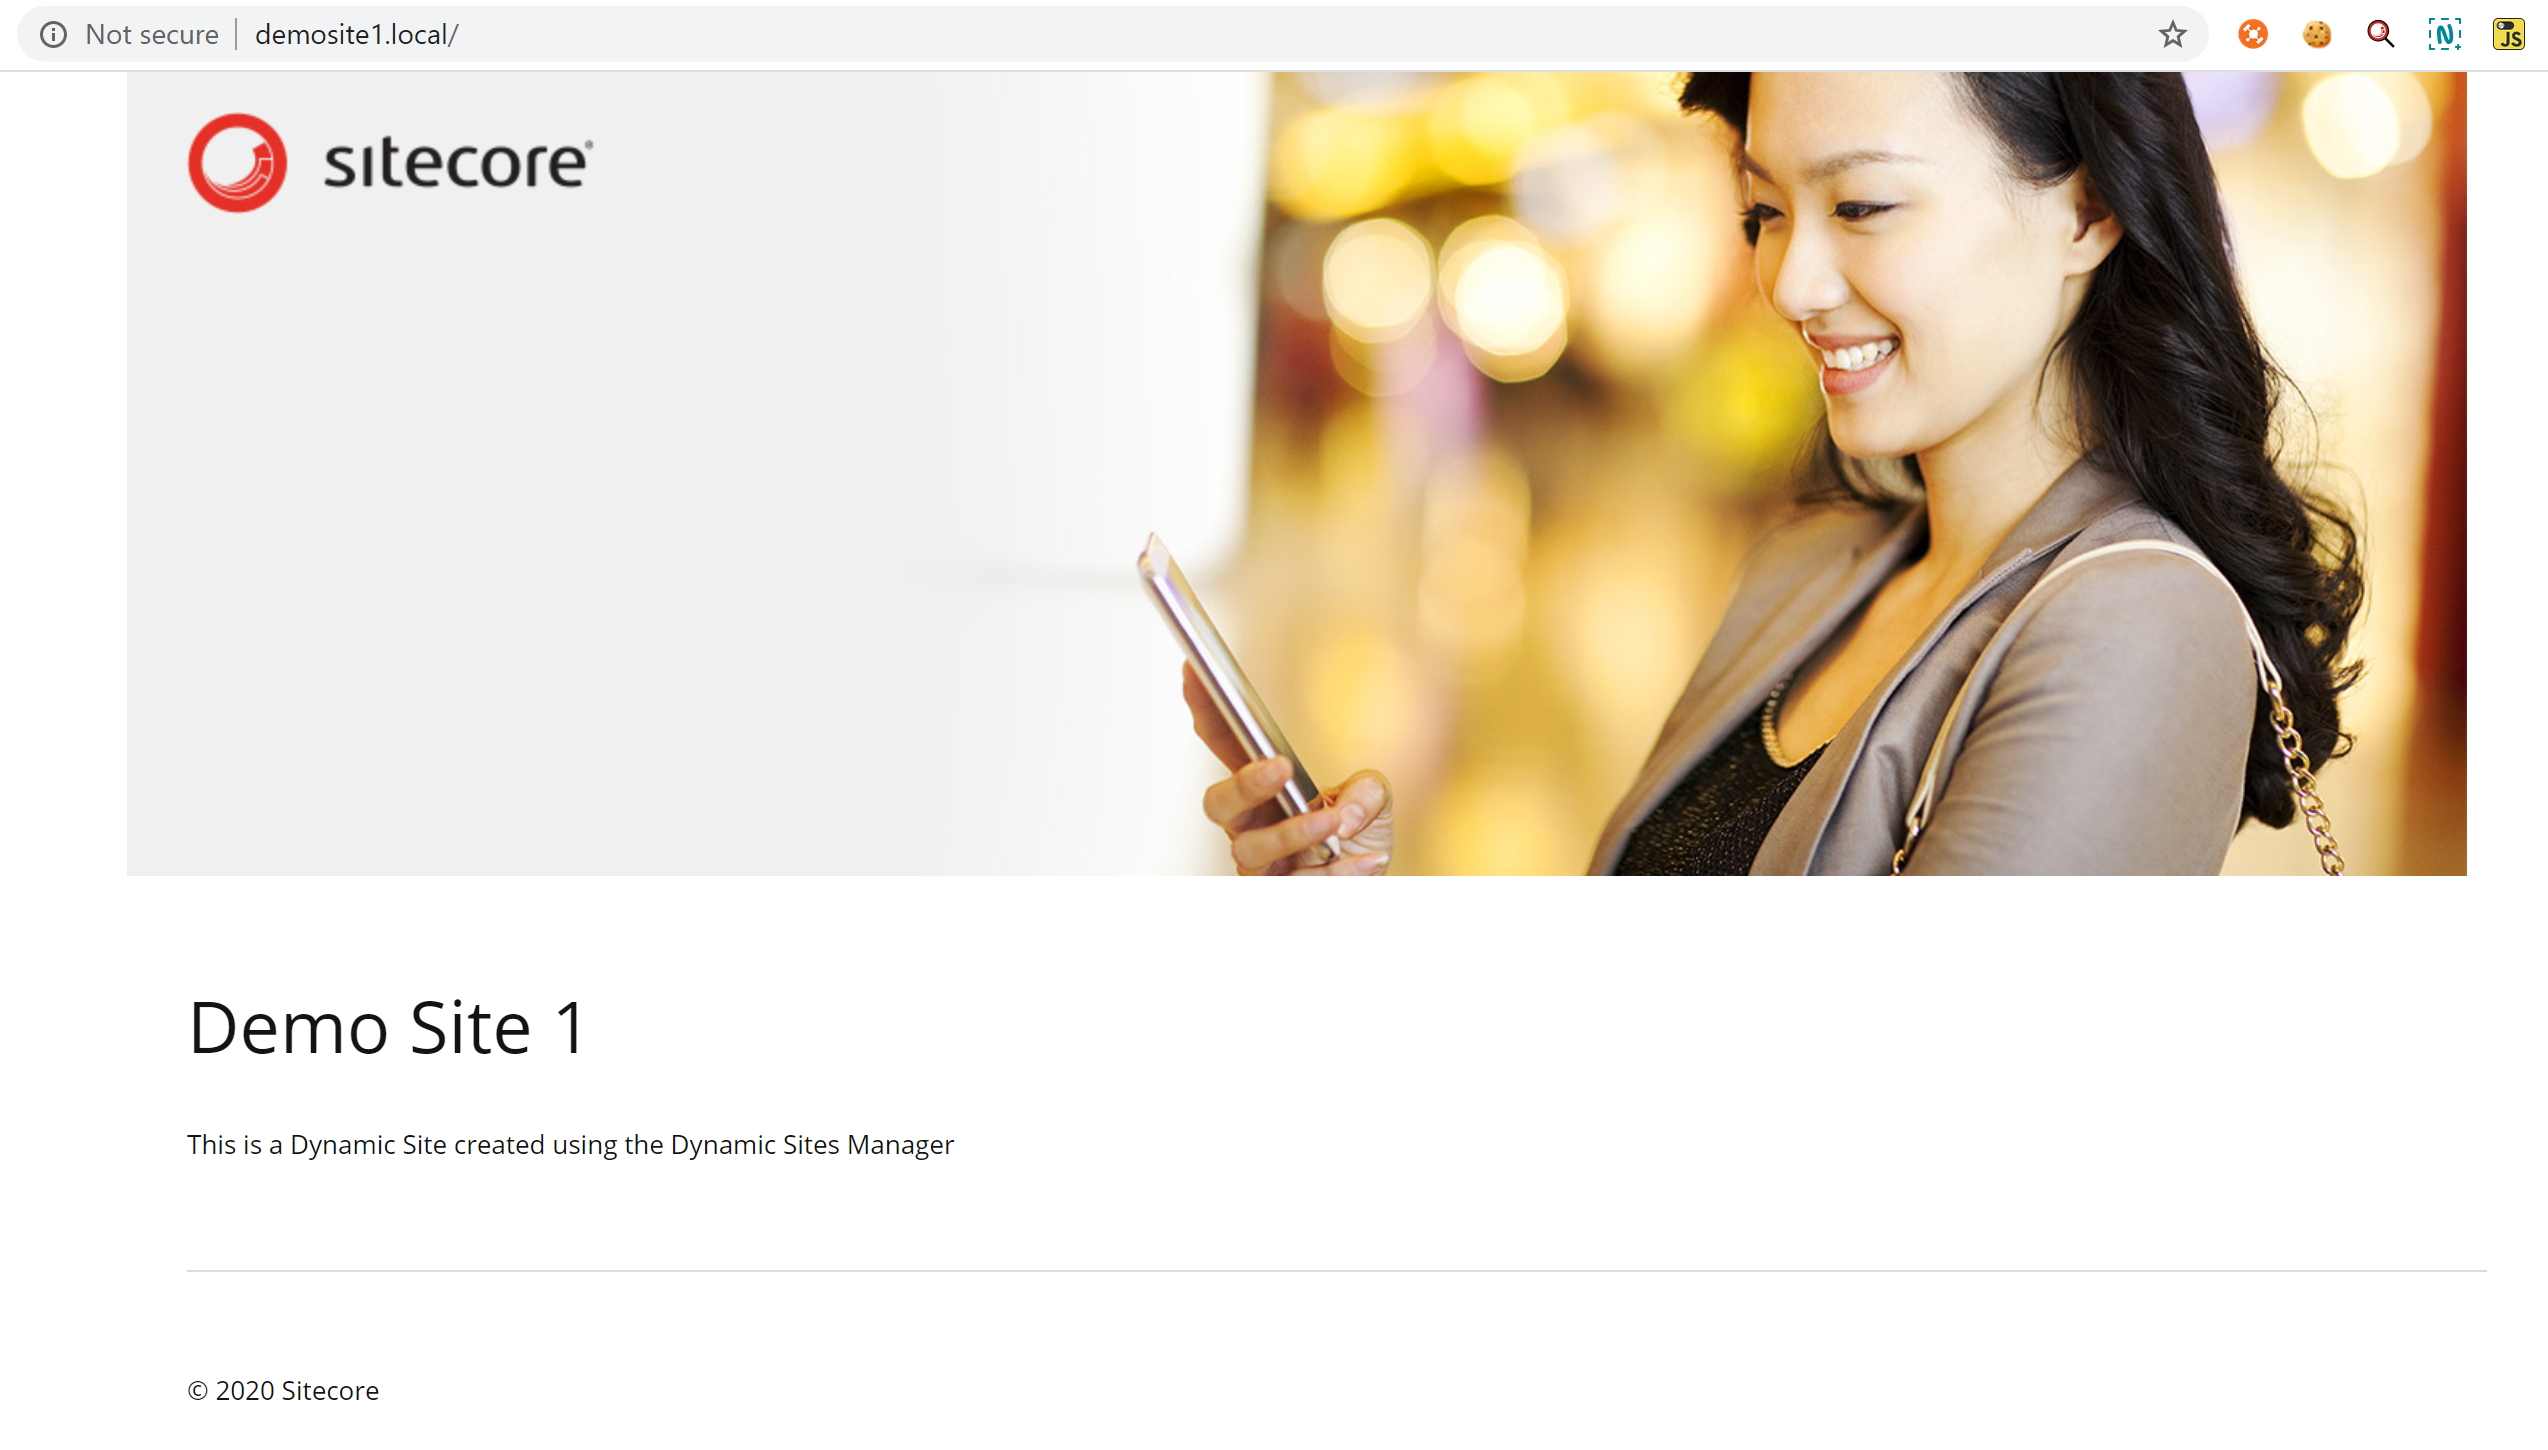
For this example I’m going to do this on my local machine but if this was on another environment the process would be very similar. I have a site called ‘Demo Site 1’ which I’ll use for this example:

dynamic-sites-1.9-install-6

  1. Go to: /sitecore/system/Modules/Dynamic Sites/Sites
  2. Right click on the folder to Insert a new Dynamic Site Definition (I called mine ‘Demo Site 1’)
  3. Configure the Key Settings for your Site such as:
    – Hostname – the url which will be used for your Site
    Home Item – the Home item of your site (In my case: /sitecore/content/Demo Site 1)
    Port – this will be (I hope!) 443 for Live but locally you may be using Port 80 perhaps. If you using a self signed cert locally you can use 443 locally too.
    Database – this will likely be web for local testing (depending on if you want to view the published or un-published content)
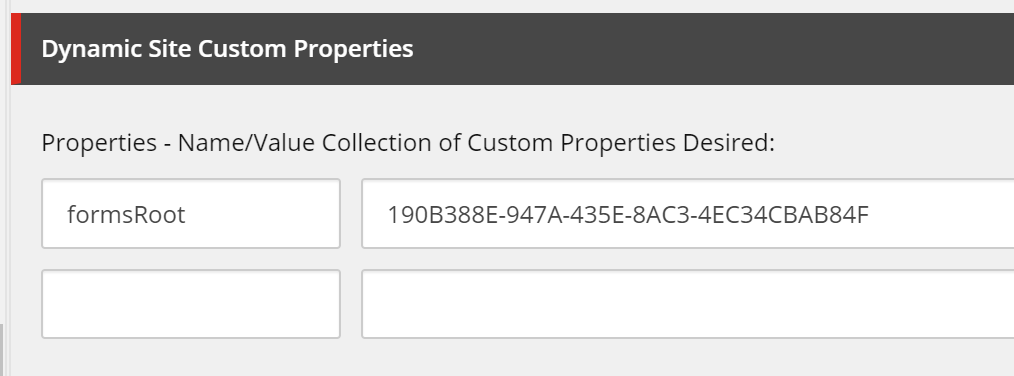
dynamic-sites-1.9-install-7

    Dynamic Site Custom Properties – you can over-ride any settings you wish that are usually on the <site> node in the Sitecore config here or you can add any custom properties you need to support. For example I had a custom cdn url property that I added which you can see below.dynamic-sites-1.9-install-8
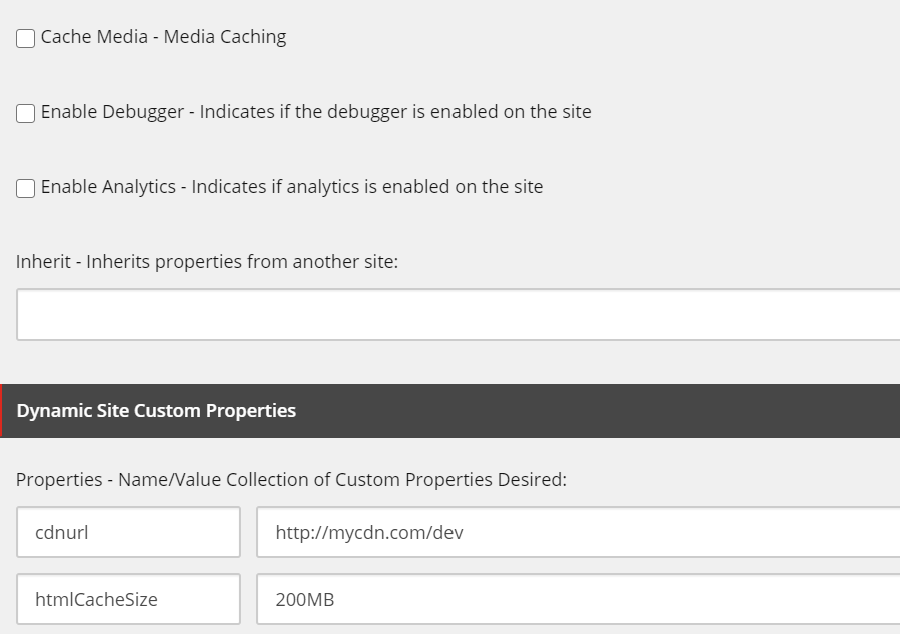
  4. Add your binding in IIS to your Sitecore site, this is my local Sitecore 8.2 u7 instance:
    dynamic-sites-1.9-install-9
  5. Add a host file entry to the Site (on another environment this would obviously be handled with a DNS).
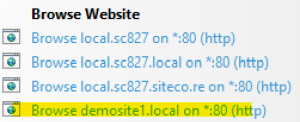
  6. Ensure your Website Homepage is in it’s final workflow step and Published. If all is well you should then see the webpage if you visit it in your browser (e.g: http://demosite1.local)

dynamic-sites-1.9-install-5

Supporting Preview / Published Sites

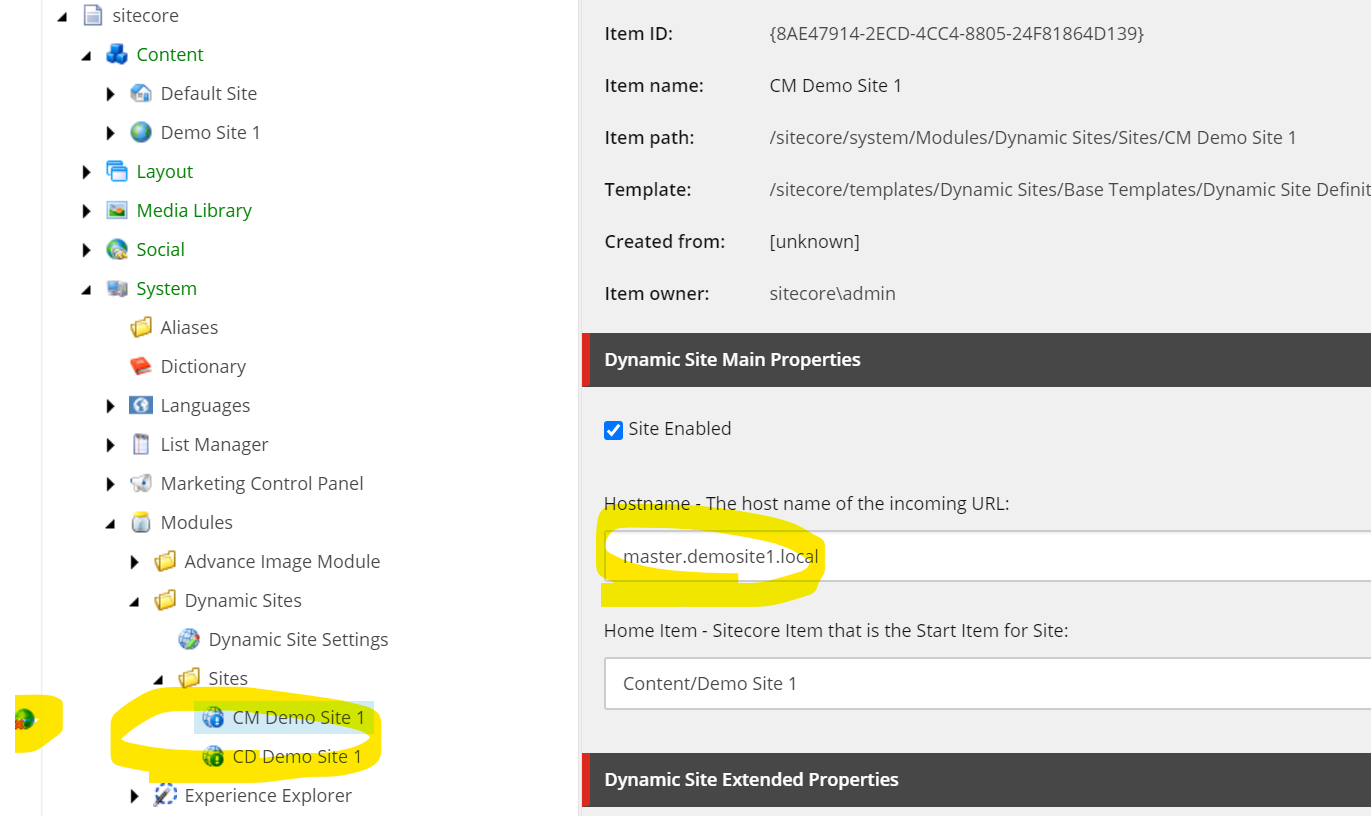
Our content editors wanted to be able to preview their content on the CM (Master) before publishing to CD (Web). I wasn’t sure on how best to handle this scenario so I reached out to Pete on Slack and he was really Helpful.

It turns out the best way to set this up is to create two Site Definition items, one for CM and one for CD. Both sites should have the Home Item set as the same (most other settings will be the same also).

The CM Site Definition item needs to be at the top of the list (above the CD Site Definition item – so it resolves first on the CM) and be set as un-publishable. Note I’ve pre-fixed my Site Definitions with CM and CD to easily identify them:

dynamic-sites-1.9-install-11


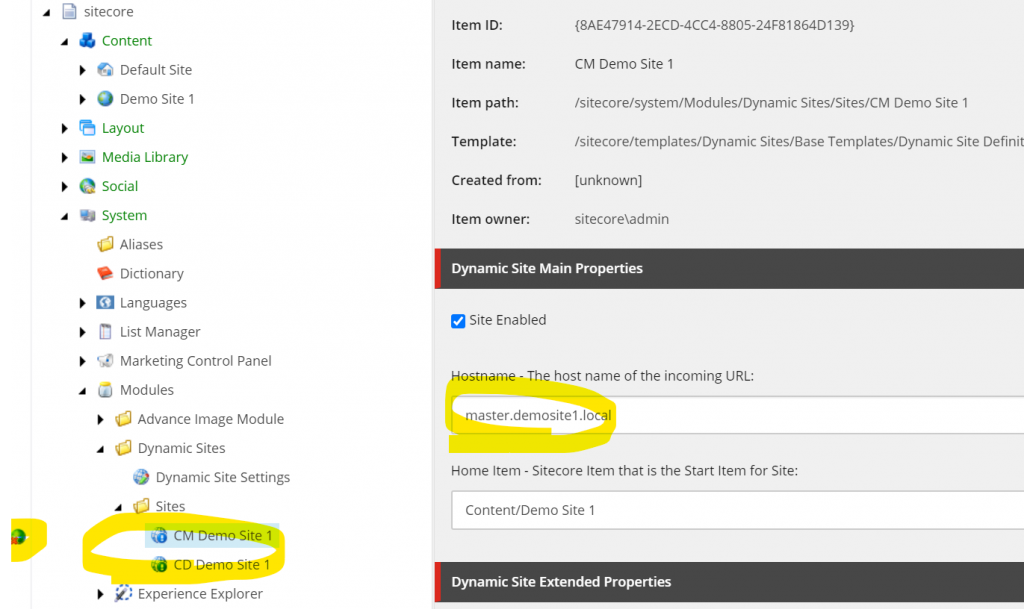
You then need to configure a different hostname for the CM Site (e.g: master.demosite1.local). If all is well you should be able to view the master site and see differences in the Master content:

dynamic-sites-1.9-install-12

Other Considerations

WFFM

One of the stumbling blocks I came across is that when configuring the default Web Forms For Marketeers form folder I got an error as it couldn’t find an ID. The issue was that I was including the brackets within the config in the Site Definition. Therefore ensure you remove the brackets like so:

dynamic-wffm

Unicorn

If you use Unicorn to sync your Sitecore items across environments. You may wish to sync your Dynamic sites and content via Uncorn. I settled on 2 different configurations to handle this.

A new items only configuration to deploy the Main Site Home Item only one like so (this is redacted):

<configuration name="Dynamic Sites New Items Only" description="Unicorn Config for new Dynamic sites items only (Existing items, deleted items or changed items are ignored)">
 <evaluator type="Unicorn.Evaluators.NewItemOnlyEvaluator, Unicorn" singleInstance="true"/>
 <dataProviderConfiguration enableTransparentSync="false" />
 <predicate>
 <include name="DynamicSitesNewItemsOnlyDemoSite1" database="master" path="/sitecore/content/Demo Site 1/Home">
 <exclude children="true"/>
 </include>
 </predicate>
 <dataProviderConfiguration enableTransparentSync="false" />
 <syncConfiguration updateLinkDatabase="true" updateSearchIndex="true" />
</configuration>

A main configuration to deploy component content folders and setting items to the site likes so (this is redacted):

<configuration name="DynamicSites" description="Unicorn Config for DynamicSites Items">
<predicate>
 <exclude path="/sitecore/content/Demo Site 1/Home" />
 <exclude childrenOfPath="/sitecore/content/Demo Site 1">
 <except name="Forms" includeChildren="false"/>
 <except name="Components" includeChildren="false"/>
 </exclude>
 <exclude childrenOfPath="/sitecore/content/Demo Site 1/Components/Banners" />
 <exclude childrenOfPath="/sitecore/content/Demo Site 1/Components/Promos" />
 <include name="DynamicSitesMediaFolders" database="master" path="/sitecore/media library/DynamicSites" includeChildren="true">
 <exclude childrenOfPath="/sitecore/media library/DynamicSites/Demo Site 1/Images"/>
 <exclude childrenOfPath="/sitecore/media library/DynamicSites/Demo Site 1/Files"/>
 </include>
</predicate>
<!--exclude the dynamic sites fields that will be different for each environment-->
<fieldFilter type="Rainbow.Filtering.ConfigurationFieldFilter, Rainbow">
 <exclude fieldID="{2E6EA147-39B4-48B9-B729-89DB73646518}" note="'Hostname'" key="Hostname" />
 <exclude fieldID="{671F0A96-8270-49C6-B25C-17A4A4EE5730}" note="'Port'" key="Port" />
 <exclude fieldID="{A9B6C54F-88CB-4A9F-9250-6B2B1D26B79C}" note="'Properties'" key="Properties" />
 <exclude fieldID="{E6869EFC-46EB-458E-9990-3DBF914E6F85}" note="'Database'" key="Database" />
</fieldFilter>
<dataProviderConfiguration enableTransparentSync="false" />
<syncConfiguration updateLinkDatabase="true" updateSearchIndex="true" />
</configuration>

Note the use fieldFilter usage here to exclude deployment of the environment specific fields such as the Hostname.

Caching

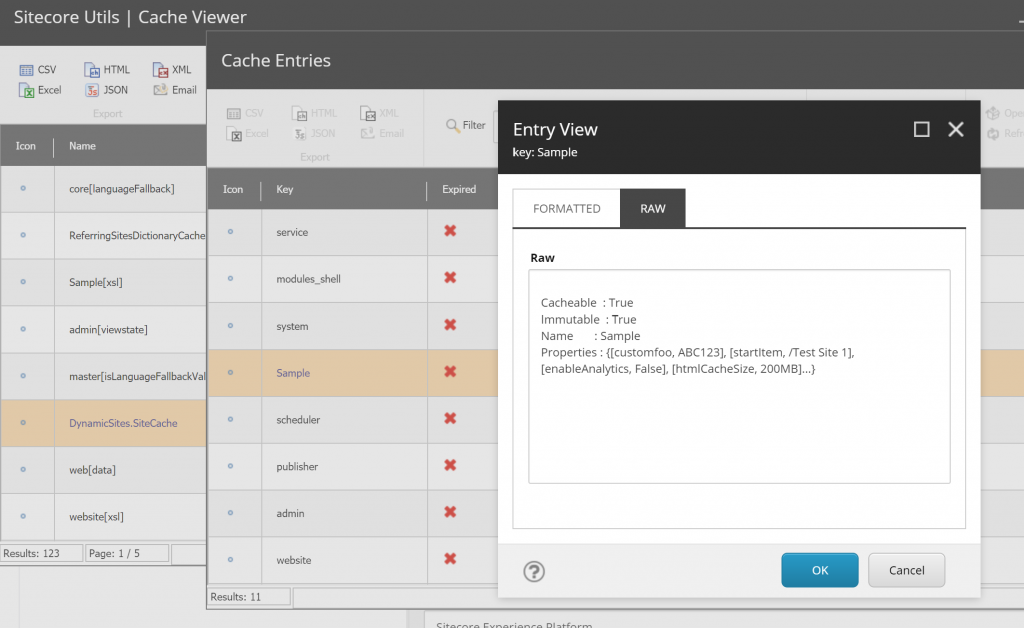
The caching for the Dynamic Sites module has been implemented using a custom Sitecore cache and therefore shows up in the Sitecore Cache.aspx page viewer. If you want to explore what is in the cache to debug any issues with Caching then you might want to use an tool to do so. I used this Cache Viewer SPE Module and it worked really well for seeing the cache for each Site. The cache key used is DynamicSites.SiteCache.

dynamic-cacheviewer

You should find that if you clear the cache then any settings you update should update and be reflected.

Default Context Database Issue

We had some issues serving some Dynamic Sites from the CD Server. The error we were seeing was:

ERROR An error while Initializing occurred
Exception: System.InvalidOperationException
Message: Could not find configuration node: databases/database[@id='master']
Source: Sitecore.Kernel
 at Sitecore.Configuration.DefaultFactory.GetConfigNode(String xpath, Boolean assert)
 at Sitecore.Configuration.DefaultFactory.CreateObject(String configPath, String[] parameters, Boolean assert)
 at Sitecore.Configuration.DefaultFactory.GetDatabase(String name, Boolean assert)
 at Sitecore.Configuration.DefaultFactory.GetDatabase(String name)
 at Sitecore.SharedSource.DynamicSites.Utilities.DynamicSiteSettings.get_GetCurrentDatabase()
 at Sitecore.SharedSource.DynamicSites.Utilities.DynamicSiteSettings.get_GetSettingsItem()
 at Sitecore.SharedSource.DynamicSites.Utilities.DynamicSiteSettings.get_SitesFolder()
 at Sitecore.SharedSource.DynamicSites.Utilities.DynamicSiteManager.GetDynamicSitesDictionary(Site defaultSite)
 at Sitecore.SharedSource.DynamicSites.Sites.DynamicSitesProvider.InitializeSites()
 at Sitecore.SharedSource.DynamicSites.Sites.DynamicSitesProvider.GetSites()

After some further digging into the DynamicSiteSettings class It turned out that for some reason the module was not finding the context database and so was falling back to Master in this block of code:

public static Database GetCurrentDatabase
 {
 get
 {
 return Context.ContentDatabase ?? Context.Database ?? Database.GetDatabase("master");
 }
 }

Our CD servers do not have access to the Master database so thats why the error only occurred on CD. To resolve this I branched the module and added a setting for the database fall-back instead of a hard coded ‘master’ value. This is set like so in the config:

<!-- Dynamic Sites - Fallback Current Database
 The database to fallback to when getting the current database 
 if Context.ContentDatabase & Context.Database are null
 -->
 <setting name="DynamicSites.FallbackCurrentDatabase" value="master" />

On our CD servers we set this to Pub where our published live content exists and this resolved the issue. This issue doesn’t seem to occur on an out of the box install of 8.2 u7 or 9.0 so It may be a nuance of our specific setup but if you come across if feel free to use my patched version.

Conclusion

We’ve only launched two Sites using the Dynamic Sites Manager Module so far but it’s working really well. Obviously you don’t get a bunch of pre-built components and some of the other Bells and Whistles you get with SXA but if you need  flexible, simple, well implemented, and full-featured Microsite/Dynamic Site solution which allows you to use your existing page templates and components then I can highly recommend it.

Thanks again to Pete for his hard work on this and his assistance. I’ll try not to ask him any more questions…

Installing Sitecore 9.3 And Horizon

TLDR

Installing Sitecore Horizon involves first installing Sitecore 9.3 and then Installing Horizon as a separate module from here. Follow the Sitecore Horizon install instructions below.

Sitecore 9.3 dropped yesterday and It ships with a number of updates to JSS, SXA, Sitecore MVC and Sitecore Forms and more. However the Mostly Highly anticipated part of this release is Horizon – Sitecore’s all new Page Editing interface (yes ‘Page Editor’ is back – but this time built with Node and much faster). Horizon also has Simulator Mode and Insights View which look pretty cool.

horrizon-editing

For those of you keen to take a look at Horizon in more detail this blog post is going to give you an overview of how to install Sitecore 9.3 and Install Sitecore Horizon on a local development environment.

Sitecore 9.3 Install

In 9.2 Sitecore released a new simple installer called SIA (Sitecore Installer Assistant) and that is what we are going to use to install Sitecore 9.3. You can also install Sitecore via SIF and ARM Templates but were going for the quickest and simplest option in this post.

SIA will also install all of the elements now required to run an Sitecore instance for you such as Solr, Identity Server and xConnect. It doesn’t however install Horizon for you so we’l also cover that later on in this post.

Step 1 – Download The Installer

You want the ‘Graphical setup package for XP Single’ package from this page:
https://dev.sitecore.net/Downloads/Sitecore_Experience_Platform/93/Sitecore_Experience_Platform_93_Initial_Release.aspx.

Download the zip file, unblock it and extract it.

Step 2 – SIA Pre-Requisites

To use SIA (or install Sitecore 9.3 in any way) you will need to have the following in place:

  • IIS 10
  • .NET Framework 4.7.2
  • .NET Core 2.1.12 Windows Hosting Module
  • SQL Server 2016 SP2 and 2017
  • Microsoft PowerShell® version 5.1 or later
  • An Valid Sitecore Licence for 9.3

Step 3 – SIA Install Process

Run the Setup.exe file from the extracted folder and click ‘Start’.

sia-start

There are a number of great blog posts out there that cover using SIA in detail – such as Robbert Hocks excellent guide, so I’m not going to go through all the installer steps in detail, However I will summarise them here and provide some tips.

  1. Pre-requisites – SIA uses SIF under the hood and requires version 2.2 of SIF.
    It will try and install it for you but If you have issues with the installer failing at this step you may wish to check which version(s) of SIF you currently have installed:

    Get-InstalledModule -Name SitecoreInstallFramework -AllVersions

    You might need to uninstall old versions before trying SIA again. More info on this here: https://www.koenheye.be/multiple-versions-of-the-sitecore-install-framework/

  2. Install Solr – Solr is now required as part of the install. If you already have an instance of Solr running on port 8983 then choose a different port for your 9.3 install. I would suggest something like ‘sc93-‘ as the prefix as SIA installs Solr 8.1.1 for you and when it creates the windows service and folder it appends ‘solr-8.1.1’ to the prefix you enter like so: ‘sc93-solr-8.1.1’.
  3. Sitecore Settings – SIA will append ‘sc.dev.local’ to whatever you add as the instance prefix so ’93’ would make sense here. It will also use this prefix to name the XConnect and Identity Server sites too:93-sites


I bet most people will still us ‘admin/b’ as the username and password too :-).

sc-9.3-install-complete

Once you’ve completed the other steps in the installer it will validate the install and should complete the installation in around 10-15 minutes. If you have any issues then check the logs in SIA. If all went well you should be able to open your site by clicking the button on the final SIA screen or going to it in your browser, e.g: https://93sc.dev.local/.

Sitecore Horizon Install

You may have noticed during the install that SXA was an optional module you could install from SIA, unfortunately Horizon isn’t, hopefully it will be in future releases. Therefore we need to install Horizon separately. I hit a few stumbling blocks with the install which I’ll cover at the end.

Step 1 – Download The Install Files

You want the ‘Sitecore Horizon for On Premises deployment’ package from this page: https://dev.sitecore.net/Downloads/Sitecore_Horizon/93/Sitecore_Horizon_93_Initial_version.aspx

Download the zip file, unblock it and extract it.

Step 2 – Sitecore Horizon Install Pre-Requisites

Before you begin the install ensure you have the following in place:

  • You’ve installed Sitecore with HTTPS, SIF 2.2.0 & Sitecore Identity is installed (you will have done if you’ve used SIA ‘as is’)
  • Web socket protocol is installed, you can enable this under ‘turn windows features on and off’.
    web-socket-protocol


More info here: https://docs.microsoft.com/en-us/iis/get-started/whats-new-in-iis-8/iis-80-websocket-protocol-support

dotnet --info

dot-net-runtime

  • You have Node 10 and npm 6 installed. If you don’t have Node installed at all then use this download package for Windows: https://nodejs.org/dist/v10.0.0/node-v10.0.0-x86.msi.
    I prefer to use NVM myself to install and manage node versions but I could not get Horizon to start for some reason despite having node registered correctly on my Path variable in Windows.
  • Your Sitecore licence must also include Horizon or you won’t be able to run it.

Step 3 – Sitecore Horizon Install Process

Open up the parameters.ps1 file from the extracted folder and set values for the following parameters:

  • $ContentManagementInstanceName – this should be the name of the Sitecore instance you just created in IIS via SIA – e.g “93sc.dev.local”.
  • $ContentManagementWebProtocol – this should always be “https”
  • $SitecoreIdentityServerPhysicalPath – this should  be the path to the Sitecore Identify instance you just created in IIS via SIA – e.g: “C:\inetpub\wwwroot\93identityserver.dev.local”
  • $SitecoreIdentityServerPoolName – this should be the name of the Sitecore Identify instance app pool  – e.g: “93identityserver.dev.local”
  • $SitecoreIdentityServerSiteName – this should be the name of the Sitecore Identify instance – e.g: “93identityserver.dev.local”
  • $LicensePath – this should be the path to where your licence file can be found – e.g: “C:\inetpub\wwwroot\93sc.dev.local\App_Data\license.xml” – This one is important to get right to avoid some of the errors I hit with the license ending up in the wrong folder (see Troubleshooting section), the official installation PDF isn’t clear about this but it is the FULL PATH including the FILENAME.
  • $authoringHostName – this will be the url that Horizon will run on, the install file tries to set this for you based on the name of your Sitecore instance etc but you can set this if you wish, I set this to: “horizon.93sc.dev.local”. – Others have mentioned to me that when they didn’t set this they had issues. Also make sure you name the Host Name using the same domain as the Sitecore Content Management instance, so that the format is like so: {something}.{cmsinstancename} as above.  as in the official install PDF Guide it mentions a change regarding how cookies work in Chrome which will break this if you don’t follow this format.

params


Now open up the Install.ps1 file and run it (make sure you are running it as an Administrator).

horizon-install1


Wait a few minutes and the install process should complete:

horizon-install2


Once it has completed you can either go to your horizon instance in your browser, e.g “horizon.93sc.dev.local” or you can re-start and open up your Sitecore 9.3 instance and click on the swanky new Horizon Icon that you should see on your Launchpad:

horizon-icon


All being well Horizon should load and you should see the following screen:

horrizon-complete

Sitecore Horizon Install Troubleshooting

One of the main reasons I wrote this guide is I had a few issues with the install. I’m going to outline them below and the fixes required.

Debugging Horizon

First some tips on Debugging Horizon as I couldn’t find much out there on this.

    • Run the Authoring.Host.dll directly from the root folder (e.g: C:\inetpub\wwwroot\horizon.93sc.dev.local) like so to give you direct output on the errors in the console:

dotnet Authoring.Host.dll

run-host

    • Check the logs in your Horizon app (e.g: C:\inetpub\wwwroot\horizon.93sc.dev.local). By default I think they just write to the root folder. You will see two different logs: ‘AuthoringHost’ and ‘stdout’ logs. If you are not seeing any logs then edit the web.config file at the root of the Horizon app and check stdoutLogEnabled is true, you can also change the path for the log files here.

stdoutLogEnabled=”true” stdoutLogFile=”C:\inetpub\wwwroot\horizon.93sc.dev.local\logs\stdout” />

Errors & Issues

Here are some issues I had which I had to resolve.

HTTP Error 502 – Process Failure

This error basically just means that dotnet core could not run the app. It’s a pretty generic error message which can mean a number of things so you need to dig into the logs to find out more info.

horizon-error

I didn’t have an issue with my .net versions but one key thing to check first is that you have the right versions of the .net core runtime installed.

Licence Error

Looking in the logs for more info this is the first error I was getting:

Unhandled Exception: System.InvalidOperationException: License file doesn’t exist on disk.
at Sitecore.Framework.Runtime.Commands.SitecoreHostCommand.LoadLicenseXml(String filePath, String contentRootPath)
at Sitecore.Framework.Runtime.Commands.SitecoreHostCommand.OnExecuteAsync(CommandLineApplication app)
at McMaster.Extensions.CommandLineUtils.Conventions.ExecuteMethodConvention.InvokeAsync(MethodInfo method, Object instance, Object[] arguments) in C:\projects\commandlineutils\src\CommandLineUtils\Conventions\ExecuteMethodConvention.cs:line 77

To resolve this I needed to copy the licence folder into the /sitecoreruntime folder e.g: c:\inetpub\wwwroot\horizonsc93sc.dev.local\sitecoreruntime.
I’m not sure if this is a bug but the installer seemed to put the licence file in the wrong location (/config).
Thanks to Vlad for his help with this: https://sitecore.stackexchange.com/questions/23209/running-horizon-failed-http-error-502-5-process-failure.

Patch File Error

This was the 2nd error I was seeing:

Unhandled Exception: Sitecore.Framework.Configuration.Patcher.ConfigurationException: An error occurred during applying the patch file: C:\inetpub\wwwroot\horizon.93sc.dev.local\Config\license.xml —> System.Exception: Could not merge node ‘signedlicense’ in patch file ‘license.xml’
at Sitecore.Framework.Configuration.Patcher.XmlPatcher.ShouldPatchNode(XmlNode target, IXmlElement patch)
at Sitecore.Framework.Configuration.Patcher.XmlPatcher.Merge(XmlNode target, IXmlElement patch)
at Sitecore.Framework.Configuration.Patcher.XmlPatcher.ApplyPatch(String filename, XmlNode node)
at Sitecore.Framework.Configuration.Patcher.ConfigReader.LoadIncludeFiles(IEnumerable`1 files, XmlNode node)

To resolve this error I had to remove the licence that was not needed from /config (e.g: C:\inetpub\wwwroot\horizon.93sc.dev.local\Config ) as this was confusing Horizon.

Failed to render a page

I was seeing this error. This means that Horizon is running now but there is an failure in rendering the application.

horizon-load-error

NodeJs Error

Looking in the logs for more info this is the 3rd error I was seeing:

System.InvalidOperationException: Failed to start Node process. To resolve this:.

[1] Ensure that Node.js is installed and can be found in one of the PATH directories.
Current PATH enviroment variable is: C:\Program Files (x86)\Common Files\Oracle\Java\javapath;C:\Program Files (x86)\Gpg4win\..\GnuPG\bin;C:\Program Files\azcopy;C:\Program Files\Git\cmd;C:\Program Files (x86)\dotnet\;C:\Users\Adam Seabridge\AppData\Roaming\nvm;C:\Program Files\nodejs;…
Make sure the Node executable is in one of those directories, or update your PATH.

I had this issue for two reasons:

1) I was trying to use NVM to manage my node versions and it would not find my node version even though node was registered correctly on my path. I couldn’t resolve this so ended up installing Node using the Windows installer instead of NVM.
2) I needed to restart IIS after I’d installed node. I would recommend a reboot of your machine after you install Node.


That all folks. Hopefully others who are keen to see Horizon in action will find this useful.
Feel free to comment or tweet me with any suggestions on any of the installation process or things I’ve missed.

You can find the docs on Horizon here. Enjoy.

The Business Case & Considerations for a Sitecore 9.2 Upgrade

smoke-2551073_1920
I don’t often write Sitecore blog posts from a business perspective but I today I thought I would as I think some Sitecore customers are still on 8.x or 9.0 and are considering an upgrade to Sitecore 9.2.

With Sitecore 9.3 likely to be released later this year and mainstream support for 8.2 and below running out in December now is a good time to consider upgrading.

In this post I’m going to outline what the benefits of moving to 9.2 are and also the considerations you should make before embarking on an upgrade.

What are Benefits / Features of Sitecore 9.2?

This is usually one of the first questions that will be asked. I’m not going to keep this fairly high-level as there are many in-depth blog posts out there on Sitecore 9.1 & 9.2 features but the following should provide a succinct summary.

Sitecore 9.1 & 9.2 bring a lot of new features and there has been a big focus on splitting features and functionality out from the previous large monolithic architecture to a smaller modern micro-service based architecture:

  • Sitecore Cortex – Sitecore’s new Machine Learning Brain which can Suggested Personalisation and process and leverage customer data
  • Sitecore Identity – Single Sign On and Federated Authentication (using IdentityServer)
  • Sitecore Universal Tracker – Provides an central Analytics API to track  interactions from any device (e.g mobile apps, IoT, AR and VR)
  • Sitecore JavaScript Services (JSS) – allows development of apps using front-end frameworks such as Angular, React and Vue, using Sitecore as the source for the data (including SXA & Sitecore Forms support in 9.2).
  • Sitecore Accelerator Framework (SXA) Accessibility Improvements – SXA has been around for a couple of years and is a package or pre-built components for Sitecore allowing you to get sites up and running quicker.
  • Sitecore Host – A lean common runtime for .NET Core applications (Powers: Horizon, Universal Tracker, Sitecore Identity)
  • Helix Configuration – 9.1 shipped with some Helix configuration already setup. Helix is Sitecore’s recommended approach to building Sitecore Sites it sets out an number of overall design principles and conventions to follow.
  • Sitecore Installer Assistant (SIA) – 9.2 provides a new GUI for easily installing Sitecore in a few clicks
  • SSL offloading – 9.2 provides an SSL offloading config to Improve security and performance by shifting SSL Processing onto separate processors
  • Active Personalization Dashboard – 9.2 has a new new dashboard which provides an overview of all personalization actively occurring, providing visibility of poorly/well performing tactics to act upon.
  • Many other improvements including: Search, Content Delivery, xDB and Analytics, Sitecore Forms, EXM, SIF(2), YAML Item Serialization, Bug Fixes and performance Improvements

But We’re on Sitecore 8.2 or below, what else do I get?

Mainstream Support

If you are yet to upgrade to Sitecore 9 then you need to consider this soon as Mainstream support for 8.2 and below expires in December 2019. https://kb.sitecore.net/articles/641167
This means that whilst Sitecore will still provide security updates and fixes and endeavour to assist with product incidents they may not provide support for the following:

  • Assistance with errors or unexpected behaviour during installation or development
  • Addressing product defects as hot-fixes or patches
  • Compatibility fixes for supported technology platforms.

Therefore if you are on 8.2 or below after December this year then you may need to upgrade to resolve certain issues (depending on what the issues are).

Sitecore 9.0 Features

If you are on 8.2 or below you will also benefit from all the features released in 9.0, here are the key ones:

  • xConnect – Provides an unified API that centralises data access
  • Headless CMS support and JSS – Allows web apps to be built with React, Angular, Vue using Sitecore data
  • Rules based configuration – Configuration is now much simpler as it can be set based on the server role (e.g Content Delivery, Content Authoring)
  • Sitecore Install Framework (SIF) – SIF is a framework for installing Sitecore using automated scripts. This is how Sitecore 9 and above is now installed and it means deployments can be automated easier.
  • Sitecore Accelerator Framework (SXA) – SXA is a pre-built set of components to allow pages to be developed quicker with less development effort
  • Sitecore Forms – Sitecore 9.0 has newly designed forms to replace WFFM. These are built in a modern way and are easier to configure and customise.

Upgrade Considerations

sitecore-logo
So there are clearly some significant benefits to carrying out an upgrade to Sitecore 9.2, especially if you are on 8.2 still, as some customers are.
There are some additional requirements and considerations when moving to Sitecore 9.2 and standard upgrade considerations which need to be planned for:

  • Additional Servers / Roles – Due to changes to the architecture to split out elements of Sitecore into smaller services Sitecore 9, 9.1 and 9.2 require some additional Servers and roles. These are for xConnect, Identity Server, Cortex and processing. When you are planning resources for your upgrade this should be considered, particularly on Azure as there are quite a few additional services required.
  • Module Upgrades – Most Sitecore sites will make use of a number of Modules to extend the out of the box functionality. Some popular modules are: Web Forms for Marketers (WFFM), Url Rewrite and Sitecore Powershell Extensions (SPE). It is important to ensure that each module you are using is supported in Sitecore 9.2 and to consider time for upgrading each module as part of the upgrade process.
  • Updated Licence – Most customers will require a new licence generating when upgrading to Sitecore 9 and above. Therefore ensure you request this from your account manager in advance and that you have all features/modules you require included on your licence.
  • Active Directory module – Sitecore 9.1 & 9.2 or later does not support the Active Directory module. Sitecore uses Identity server to handle logins instead of legacy methods such as AD. Therefore if you are upgrading to 9.1 or above and use the AD module you will need to implement an integration with Active Directory from Identity Server.
  • Search – Sitecore 9 and above no longer supports Lucene so you must use SOLR or Azure Search. Lucene did not work well in distributed search scenarios so moving to SOLR or Azure Search has been recommended for a while. SSL is also required for SOLR in 9.0.
  • Code & Configuration Updates – Sitecore try and reduce breaking changes where possible but sometimes they are unavoidable, so as with all Sitecore upgrades some custom code and configuration will need to be updated to be compatible with Sitecore 9.2.
    To assist with this process Sitecore does provide an Express Migration Tool (to get to 9.0) and an Update Installation Wizard to update to 9.2. However these tools will likely only get you so far for highly customised Sitecore implementations and will likely need some manual upgrading too. Any code that needs upgrading will not be auto-upgraded by the tool. If you are on 8.2 then there are quite a few changes for analytics with xConnect. All references in Visual Studio will need updating to 9.2 also.
  • Support Patches & Hotfixes – You will likely have some hotfixes or support patches that have been applied to your solution over time. These will need analysing as part of the upgrade to understand if they are still required or not in 9.2. Many of these may have been rolled into 9.2 already.
  • Analytics Data upgrade – Part of the upgrade process involves migrating xDB data in the 8.x format to Sitecore 9.2 format. Sitecore have a tool for this: https://dev.sitecore.net/Downloads/Sitecore_xDB_Data_Migration_Tool/3x/xDB_Data_Migration_Tool_300.aspx
  • Implementation Quality – Best practice Sitecore implementations do not customise any out of the box Sitecore files and instead use patch files and extensions to customise configuration and other Sitecore functionality. Ideally the base platform should be installed ‘as is’ and the customisations layered on top to assist with upgradability. Depending on how well your implementation has been carried out will impact how easy it is to upgrade. If your implementation is not best practice then your team should take the time during the upgrade to correct this and take advantage of some of the newer and better ways of doing this.

A Note on Upgrading WFFM

sitecore-formsOften one of the key stumbling blocks for upgrading Sitecore to 9.1 or 9.2 is Web Forms For Marketers, this is because it was deprecated in Sitecore 9.1 and is also not supported in Sitecore 9.2. Sitecore 9.0.2 is the last release where WFFM can be used. Sitecore Forms has replaced it.  If customers have many forms this can be a bit daunting.

So you could just upgrade to Sitecore 9.0.2 and stop there, but you would be missing out on a lot of features and you will need to upgrade again in the near future. Thankfully there is another option, there is now a community built tool to help automate this for you and convert WFFM forms and data to Sitecore Experience Forms: https://github.com/afaniuolo/WFFM-Conversion-Tool. I have yet to use this but have heard good things about it and it is regularly updated.


I’ve tried to cover the key features of 9.2 and considerations for upgrading here. As you can probably see the longer you leave an upgrade the more complex it becomes as there are more changes to consider. Frequent upgrades of Sitecore should be the aim as this will reduce the time and investment needed to carry them out. Hopefully you’ll find this post useful for planning an upgrade to Sitecore 9.2 and leverage the investment you have made in the platform.

Changing Sitecore Item Data Templates with SPE

spe icon This week I needed to change a number of navigation items from an old navigation item data template to a new one. I didn’t want to have to do this by hand as I have quite a few items to update, so I decided that Sitecore Powershell Extensions (SPE) was the quickest and easiest way to do this. If you don’t know about SPE I’ve written more about it here.

There isn’t an function as such to do this in SPE so I put one together and thought I’d share it here.

How do I use it?

The function updates the data template of an item (and optionally it’s child items) from one template to another. It has 4 parameters:

  • RootItemId – Specifies an Item Id to start searching for items from
  • SourceTemplateId – Specifies the Id of the template to match items on (the template you wish to change)
  • TargetTemplateId – Specifies the Id of the template to change items to
  • Recurse – Specifies if all the child items below RootItemId should be included in the search.

An Example

Change-Template -RootItemId 36584658-7B62-4572-932E-8214A3CD7CE8 -SourceTemplateId 92C1C171-3ED0-4E8F-860A-FEAF14336A96 -TargetTemplateId DD68EBBB-4D82-411C-BA19-D95A65AAEF83 –Recurse $true

Change-Template Function

Hopefully this is useful for others who need to do something similar.

Potential Improvements / Alternatives

If you have an number of templates that you want to update in various locations in your Sitecore solution you could use the Get-ItemReferrer option before the | Where-Object query and this will get all items referencing the template instead of searching the entire Sitecore content tree. In my case however I didn’t want to update all items with old template, just ones under a specific path.

I could perhaps update my function at some point to accept a $UseGetItemReferer boolean option and also allow for a null $RootItemId in order to support this and make the function more flexible.

Simple Sitecore Content Synchronisation with Sitecore Content Migrator

As a Sitecore developer you often find you need to keep Dev and Staging environments up-to-date with Production in order to aid in development and in support and maintenance – otherwise it is very hard to successfully develop and test new features or replicate an issue from Production locally.

This used to mean manually backing up and restoring databases or creating Sitecore Packages to pull content down. This process is a labour intensive and error prone as well as a pretty daunting task :-(.

Sitecore Content Migrator to the rescue

migratorThankfully Jeff Darchuk created Sitecore Content Migrator back in October to do just this for you.

Sitecore Content Migrator is a free tool for Sitecore Sidekick which allows you to quickly and easily sync content down from one environment to another. It’s pretty simple to install and setup and then can be used whenever you want to carry out a sync.

It uses the same underlying technology as Unicorn (Rainbow), is pretty rapid and gives you some nice updates on progress along with a preview feature – so you can check all the changes before you run the import for real.

Installing & Configuring Sitecore Content Migrator

  1. First you need to install Sidekick itself. You can do this with the Sidekick Sitecore Module using the Sitecore package installer (https://marketplace.sitecore.net/en/Modules/S/Sitecore_Sidekick.aspx) or instead use NuGet to install it like so from Vistual Studios Package Manager Console:

    Install-Package SitecoreSidekickCore -Version 1.0.0.

    Ensure you install this on all environments you wish to pull content from as well as the environments where you will use it. This is because the service used by the Content Migrator must also exist remotely.

  2. Once you have installed the module you should find it has also installed 4 new config patch files (zSCS.config, zSCS.Aduitlog.config, zSCS.ContentMigrator.config, zSCS.Editingcontext.config). The one you want to edit is zSCSContentMigrator.config.
    Alter the servers list to include the environments you want to pull content from, in our case Production and Staging:

    <servers hint=”raw:BuildServerList”>
    <server>https://production.yoursite.com</server>
    <server>https://staging.yoursite.com</server>
    </servers>

Time to Sync

  1. Go to an environment where you want to sync content to. Click on the Start button and open Sitecore Sidekick. Then click on ‘Content Migrator’:
    sidekick-dashboard
  2. Select the server to pull content from (e.g ‘production.yoursite.com’), then browse the content node and select the content you wish to sync.
  3. Then check any of the following options to sync all content down and update the local site:
    –  ‘Migrate all children of selected item’
    –  ‘Overwrite all existing content with new content from the server’
    –  ‘If parent doesn’t exist locally add that too’
    –  ‘Make local content tree mirror the remote content tree’ Note: Jeff confirmed to me on Slack that this maintains the existing Sitecore IDs. So this is great if you use Unicorn and don’t want to mess up Dev content IDs.
    –  ‘Run using the event disabler’
    –  ‘Run using the bulk update context’
    Further information on these options and what they do can be found here: Sitecore Content Migrator
    content-migrator-step0

  4. Click the ‘Preview’ button
  5. Check that everything looks ok
  6. Click the ‘execute this operation’ button.
  7. Monitor the import and check that it completes successfully – look under the ‘Currently Running Operations’ section.
  8. Publish the site
  9. Test the site works as expected in your environment
  10. Rejoice as not having had to do much

Suggested Improvements

  • It would be really good to support automated scheduled syncs either by setting this up in config or saving an migration config. – I’ve already suggested this to Jeff and he’s logged it as a feature request.
  • It would also be cool to be able to sync multiple root nodes, e.g content and media library items at once.

All in all this is a great tool for making content syncs a whole lot simpler and allowing you to concentrate on development instead of manually keeping your environments in sync.