By now you probably know installing Sitecore 9 is a bit different to previous versions and instead of using an installer the process involves using The Sitecore Install Framework (or SIF) to install Sitecore.
When Sitecore 9 first came out I made numerous attempts to install it on my Windows 8.1 machine and couldn’t get it to work due to an issue with SSL certs for xConnect. Apparently it’s possible to get working but I couldn’t get past the issue so decided I’d upgrade to Windows 10 instead.
Sitecore 9 Update-1 came out earlier this week and after upgrading to Windows 10 over the Christmas break I decided it was time to have another go.
I’ve kept a close eye on the Community tools and blog posts for helping with installing Sitecore 9 over the past two months and think the approach I have outlined below is pretty quick and fairly simple.
Prerequisites
First up you need to make sure you have the following in place to follow this guide:
- Windows 10
- Sql Server 2014 or 2016 SP1 (for xdb)
- IIS 8.5 > 10 (IIS 8 is not supported by SIF)
- Java Runtime Environment (JRE) version 1.8 or higher: (required for Solr 6.6.2 ) http://www.oracle.com/technetwork/java/javase/downloads/jre9-downloads-3848532.html
- Powershell v5.1 (you can check your version by running: $PSVersionTable.PSVersion)
- Web Deploy 3.6 for Hosted Servers (using Web Platform Installer in IIS)
- A Sitecore Licence
Step 1 – Install Solr
Other than the above prerequisites Solr is a core requirement for Sitecore 9+. Solr must be installed running SSL and for Sitecore 9 Update 1 Solr 6.6.2 is a requirement (not 6.6.1)
By far the easiest way I’ve found to do this is to use the awesome Power Shell script that Jeremy Davis wrote. It downloads Solr 6.6.2 and installs it with NSSM with SSL enabled. Just copy the gist below to your machine and save it as Install-Solr.ps1.
You should be able to leave everything as it is other than:
- The $JREVersion variable – this should be the same as your Java version
- The $JREPath – this should be the path to your Java version
My settings looked like this: 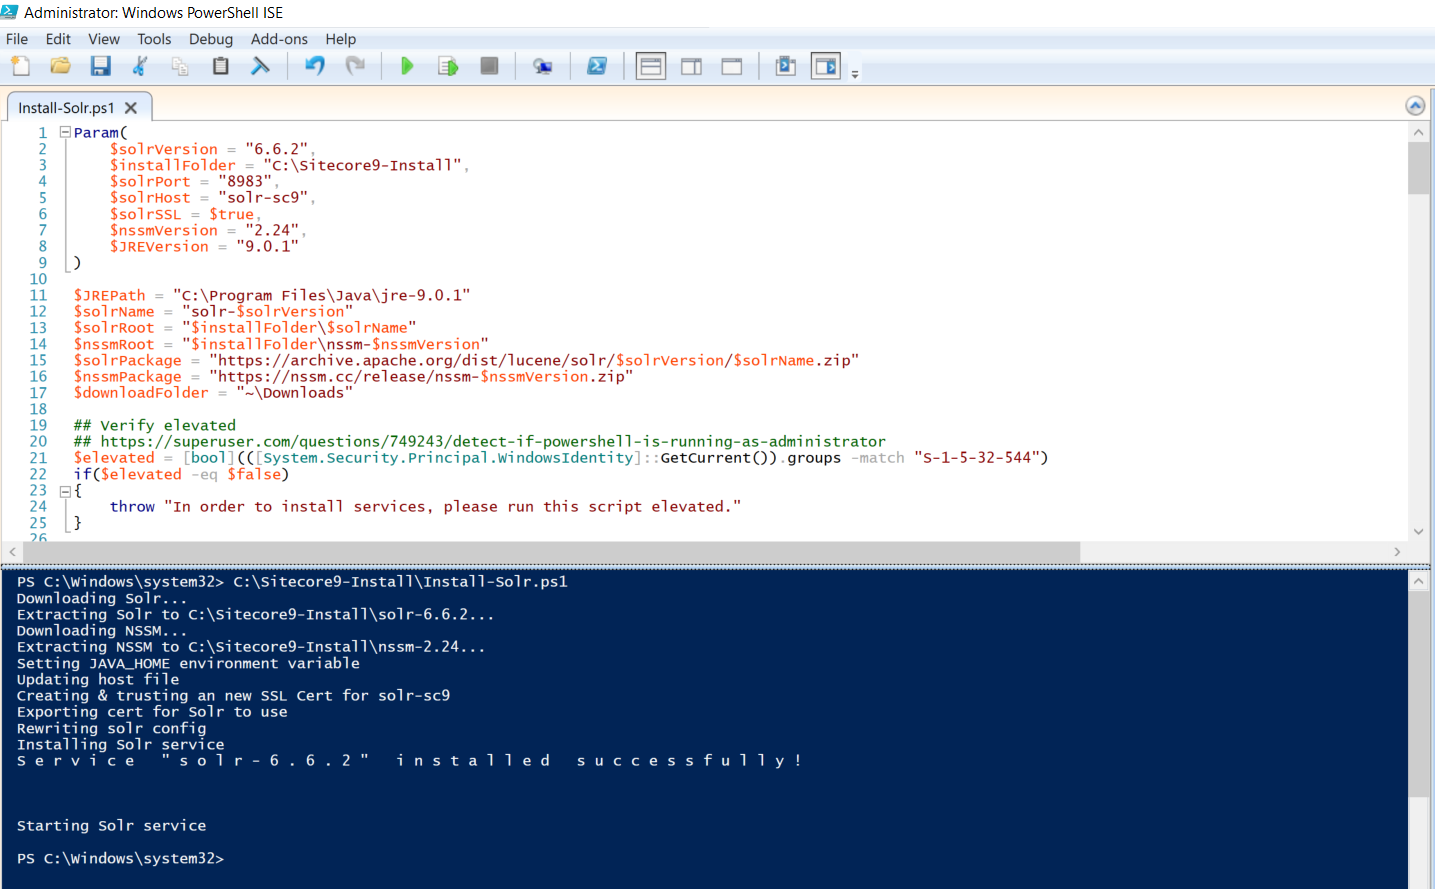 Save the file and execute it with right admin permissions.
more info here: https://jermdavis.wordpress.com/2017/10/30/low-effort-solr-installs/.
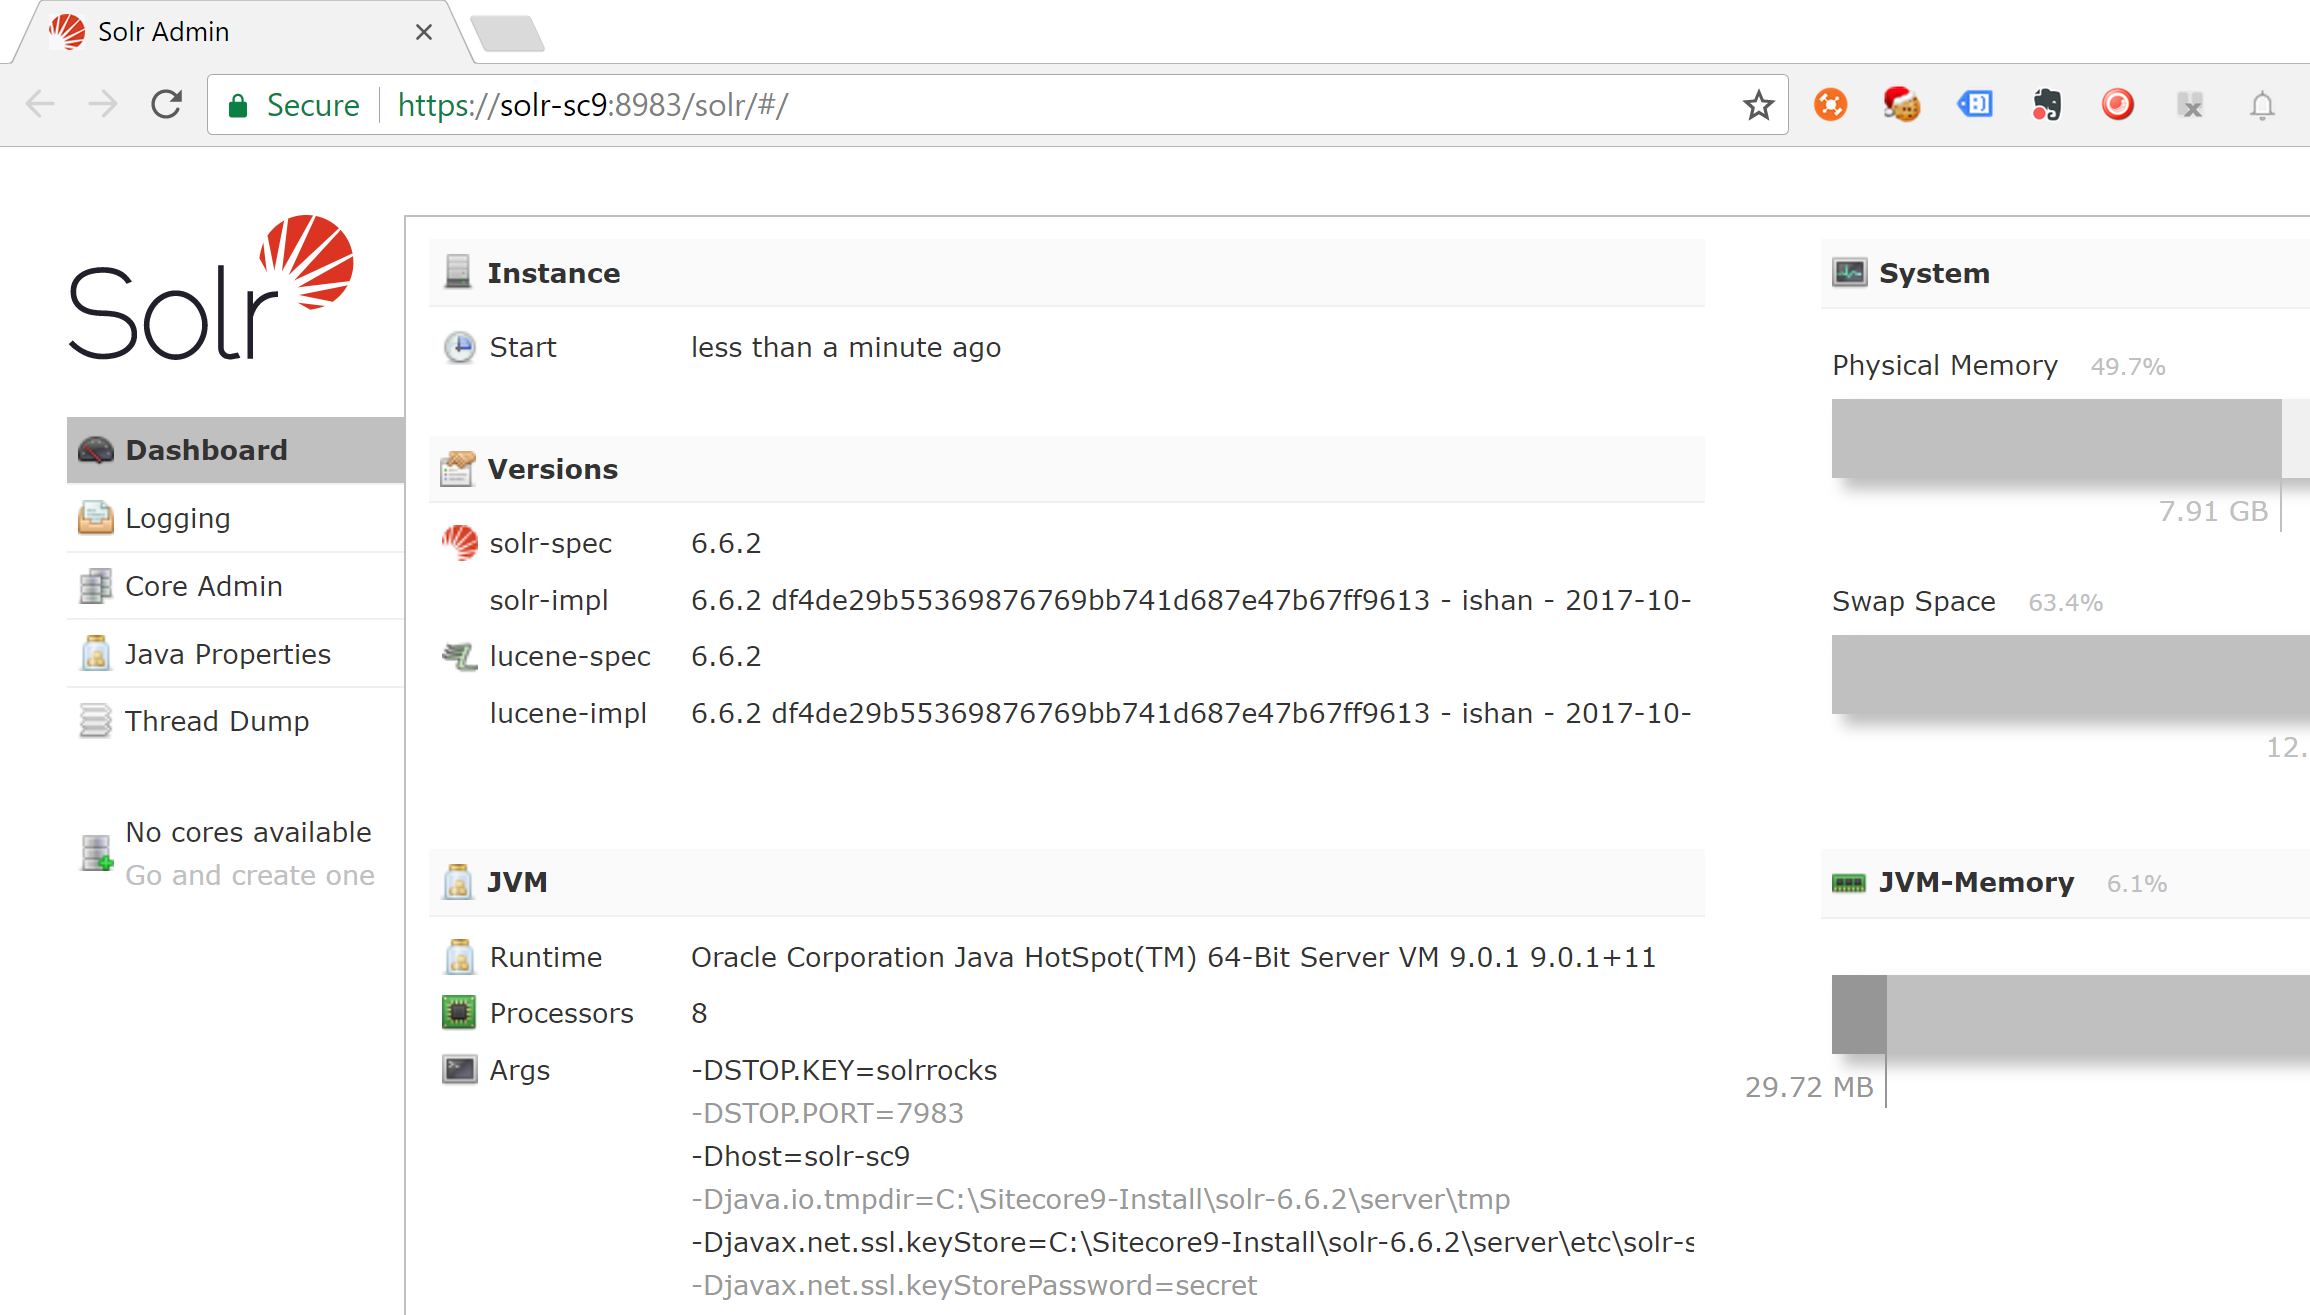
Once the script completes you should see Solr open in a browser and look like this:
Step 2 – Prepare Your Install Folder
The next step is to save the files you need to install Sitecore 9 Update 1 to the correct location for the install.
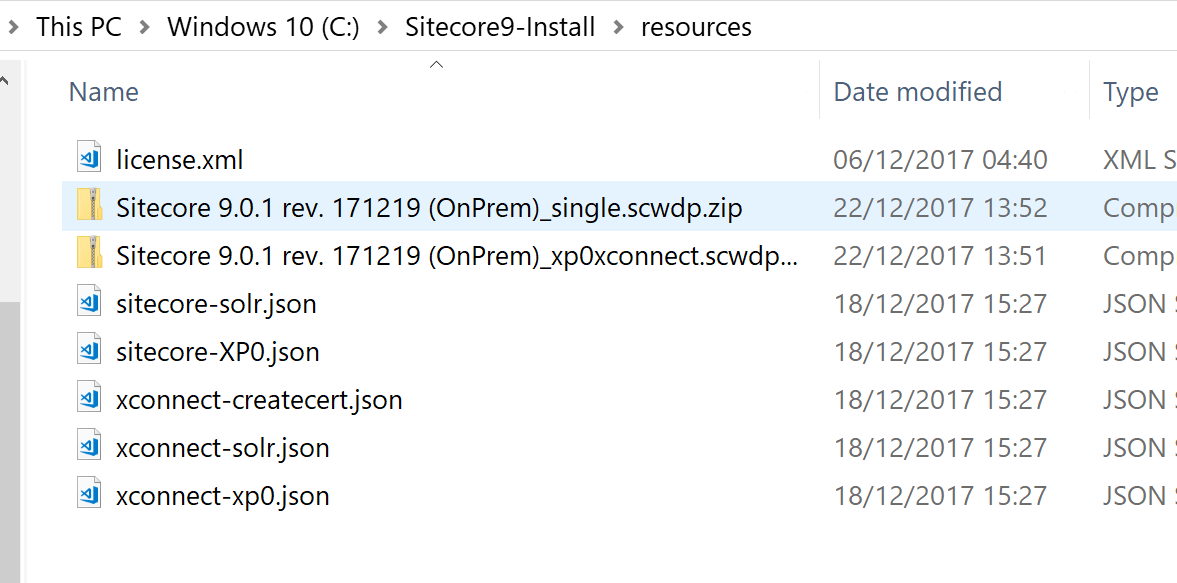
- Create an install folder on your machine, I decided on ‘C:\Sitecore9-Install\resources’.
- Download the ‘Sitecore 9.0.1 rev. 171219 (WDP XP0 packages).zip’ install file from here: https://dev.sitecore.net/~/media/8551EF0996794A7FA9FF64943B391855.ashx
- Unblock and Unzip the folder
- Copy ‘Sitecore 9.0.1 rev. 171219 (OnPrem)_single.scwdp.zip’ and ‘Sitecore 9.0.1 rev. 171219 (OnPrem)_xp0xconnect.scwdp.zip’ from the unzipped folder to ‘C:\Sitecore9-Install\resources’
- Unzip ‘XP0 Configuration files 9.0.1 rev. 171219.zip’ and also copy the contents into: ‘C:\Sitecore9-Install\resources’
- Lastly copy your Sitecore licence file into ‘C:\Sitecore9-Install\resources’ also.
Your install folder should look like so:
Step 3 – Install SIF
The next step is to install SIF so that you can use it to Install Sitecore. Save the following powershell script to your machine as Install-Sif.ps1 and run it with the correct admin permissions:
Step 4 – Install Sitecore 9 Update 1
Finally you can Install Sitecore. Save the following Powershell Script to your machine as Install-Sitecore9.ps1. It is from the official Sitecore 9 Update 1 install guide.
Edit the following paramaters:
- $prefix – I set this to ‘sc91’ but you can call your instance what you want
- $PSScriptRoot – set this to your install folder location, e.g: ‘C:\Sitecore9-Install\resources’
- $SolrUrl – Set this to the path of your Solr instance you installed at Step 1. e.g: ‘https://solr-sc9:8983/solr’
- $SqlServer – Set this to the name of your local SQL Instance, mine is ‘./’ (you may need to use this format for a named instance: “.\SQL2016″)
- $SqlAdminUser – Set this to a user that has permissions to create databases, I used the ‘sa’ account
- $SqlAdminPassword – Set the password for the user above
Finally run the script with the correct admin permissions.
Wait for the script to run, It will take a few minutes to install everything.
It’s worth noting an alternative way to do this is to use Sif-less which uses SIF under the hood to install Sitecore but with a nice UI (a bit like SIM). However I decided to go with the standard Powershell install instead this time round.
Hello Sitecore 9…
All being well you should have an new Shiny Sitecore 9 Update 1 instance installed. You can now run the post install steps for xConnect (see the guide below).
You can find more info and the official install guide here: https://dev.sitecore.net/Downloads/Sitecore_Experience_Platform/90/Sitecore_Experience_Platform_90_Update1.aspx

Lastly thanks to the Community for these Blog posts (and others) that have helped with putting this together:
https://jermdavis.wordpress.com/2017/10/30/low-effort-solr-installs/
http://www.rockpapersitecore.com/2017/10/introducing-sif-less-for-easy-sitecore-9-installation/
https://kamsar.net/index.php/2017/11/The-lazy-way-to-install-Sitecore-9/


getting below issue while installing xconnect
[——————————————— CreatePaths : EnsurePath ———————————————-]
[CreatePaths]:[Create] C:\inetpub\wwwroot\sc901.xconnect
[——————————————- CreateAppPool : AppPool ————————————————-]
[CreateAppPool]:[Exists] sc901.xconnect
[CreateAppPool]:[Setting] processModel.identityType => ApplicationPoolIdentity
[————————– SetAppPoolCertStorePermissions : FilePermissions —————————————–]
WARNING: Could not find Cert: C:\certificates\sc901.xconnect_client.crt in Cert:\Localmachine\My
**********************
Command start time: 20180223190824
**********************
PS>TerminatingError(Invoke-ResolveCertificatePathConfigFunction): “The running command stopped because the preference variable “ErrorActionPreference” or common parameter is set to Stop: Cert:\Localmachine\My is not a valid Certificate Path”
>> TerminatingError(Invoke-ResolveCertificatePathConfigFunction): “The running command stopped because the preference variable “ErrorActionPreference” or common parameter is set to Stop: Cert:\Localmachine\My is not a valid Certificate Path”
>> TerminatingError(GetConfigFunctionResult): “The running command stopped because the preference variable “ErrorActionPreference” or common parameter is set to Stop: Unable to parse [ResolveCertificatePath(variable(‘Security.XConnect.CertificatePath’))] – Exception calling “InvokeWithContext” with “2” argument(s): “The running command stopped because the preference variable “ErrorActionPreference” or common parameter is set to Stop: Cert:\Localmachine\My is not a valid Certificate Path””
>> TerminatingError(GetConfigFunctionResult): “The running command stopped because the preference variable “ErrorActionPreference” or common parameter is set to Stop: Unable to parse [ResolveCertificatePath(variable(‘Security.XConnect.CertificatePath’))] – Exception calling “InvokeWithContext” with “2” argument(s): “The running command stopped because the preference variable “ErrorActionPreference” or common parameter is set to Stop: Cert:\Localmachine\My is not a valid Certificate Path””
>> TerminatingError(GetConfigFunctionResult): “The running command stopped because the preference variable “ErrorActionPreference” or common parameter is set to Stop: Unable to parse [ResolveCertificatePath(variable(‘Security.XConnect.CertificatePath’))] – Exception calling “InvokeWithContext” with “2” argument(s): “The running command stopped because the preference variable “ErrorActionPreference” or common parameter is set to Stop: Cert:\Localmachine\My is not a valid Certificate Path””
>> TerminatingError(GetConfigFunctionResult): “The running command stopped because the preference variable “ErrorActionPreference” or common parameter is set to Stop: Unable to parse [ResolveCertificatePath(variable(‘Security.XConnect.CertificatePath’))] – Exception calling “InvokeWithContext” with “2” argument(s): “The running command stopped because the preference variable “ErrorActionPreference” or common parameter is set to Stop: Cert:\Localmachine\My is not a valid Certificate Path””
Install-SitecoreConfiguration : Unable to parse [ResolveCertificatePath(variable(‘Security.XConnect.CertificatePath’))]
– Exception calling “InvokeWithContext” with “2” argument(s): “The running command stopped because the preference
variable “ErrorActionPreference” or common parameter is set to Stop: Cert:\Localmachine\My is not a valid Certificate
Path”
At C:\resourcefiles\install-xconnect.ps1:28 char:1
+ Install-SitecoreConfiguration @xconnectParams
+ ~~~~~~~~~~~~~~~~~~~~~~~~~~~~~~~~~~~~~~~~~~~~~
+ CategoryInfo : NotSpecified: (:) [Write-Error], WriteErrorException
+ FullyQualifiedErrorId : Microsoft.PowerShell.Commands.WriteErrorException,Install-SitecoreConfiguration
Install-SitecoreConfiguration : Unable to parse
[ResolveCertificatePath(variable(‘Security.XConnect.CertificatePath’))] – Exception calling “InvokeWithContext” with
“2” argument(s): “The running command stopped because the preference variable “ErrorActionPreference” or common
parameter is set to Stop: Cert:\Localmachine\My is not a valid Certificate Path”
At C:\resourcefiles\install-xconnect.ps1:28 char:1
+ Install-SitecoreConfiguration @xconnectParams
+ ~~~~~~~~~~~~~~~~~~~~~~~~~~~~~~~~~~~~~~~~~~~~~
+ CategoryInfo : NotSpecified: (:) [Write-Error], WriteErrorException
+ FullyQualifiedErrorId : Microsoft.PowerShell.Commands.WriteErrorException,Install-SitecoreConfiguration
[TIME] 00:00:01
**********************
Windows PowerShell transcript end
End time: 20180223190824
**********************
Did you manage to get past this error? from the error details it looks like your path to your cert isn’t correct: “Cert:\Localmachine\My”
It’s there any script available to update Sitecore 8.2 to 9.0 update 1?
Thank you
Kiki
There is an express migration tool but I looks like this only supports going from < 8.0 update 7 up to Sitecore 9.0. Perhaps Sitecore will update this to support later versions of 8.x and also going up to 9.0 update 1 or higher. More info can be found here: https://dev.sitecore.net/Downloads/Express_Migration_Tool/31/Express_Migration_Tool_31.aspx
I’m having this error:
Install-SitecoreConfiguration : Cannot retrieve the dynamic parameters for the cmdlet. Retrieving the COM class factory for component with CLSID {688EEEE5-6A7E-422F-B2E1-6AF00DC944A6}
failed due to the following error: 80040154 Class not registered (Exception from HRESULT: 0x80040154 (REGDB_E_CLASSNOTREG)).
At \\tsclient\E\Sitecore\Sitecore 9.0 Upgrade 1\Sitecore9.ps1:47 char:1
+ Install-SitecoreConfiguration @xconnectParams
+ ~~~~~~~~~~~~~~~~~~~~~~~~~~~~~~~~~~~~~~~~~~~~~
+ CategoryInfo : NotSpecified: (:) [Write-Error], WriteErrorException
+ FullyQualifiedErrorId : Microsoft.PowerShell.Commands.WriteErrorException,Install-SitecoreConfiguration
[TIME] 00:00:00
Transcript stopped, output file is C:\Windows\system32\xconnect-xp0.180227 (2).log
Invoke-AppPoolTask : Cannot retrieve the dynamic parameters for the cmdlet. Retrieving the COM class factory for component with CLSID {688EEEE5-6A7E-422F-B2E1-6AF00DC944A6} failed due to
the following error: 80040154 Class not registered (Exception from HRESULT: 0x80040154 (REGDB_E_CLASSNOTREG)).
At C:\Program Files\WindowsPowerShell\Modules\SitecoreInstallFramework\Public\Install-SitecoreConfiguration.ps1:253 char:21
+ & $entry.Task.Command @paramSet | Out-Default
+ ~~~~~~~~~~~~~~~~~~~~~~~~~~~~~~~
+ CategoryInfo : InvalidArgument: (:) [Invoke-AppPoolTask], ParameterBindingException
+ FullyQualifiedErrorId : GetDynamicParametersException,Invoke-AppPoolTask
Thanks for this!
One problem with it is in line on Install-Sitecore9.ps1:
$SqlServer = “./”
I have multiple instances on SQL server on my machine so changed it to:
$SqlServer = “./SQL2016”
Then I have errors during the installation of DB packages for xConnect. As the correct should be (with backslash):
$SqlServer = “.\SQL2016”
It’s silly mistake. But please update the script so you won’t confuse the other devs.
Thanks for letting me know. I’ve actually installed Sitecore 9 again this week and can get this to work for me with “.” or “./” or “.\” but perhaps depending on how the instance is named you need to use a backslash. That bit of the scripts is fairly user-specific but worth pointing out anyway so I’ve updated the instructions with a note. Cheers.
I don’t get any issues when following above steps. Perfect!
Glad this all worked ok for you Arjunan.